
How to use nodes in Lychee Studio
Lychee Studio has no timeline and no layer stack. It has a canvas, and you place nodes on it. Each node does one job: hold a prompt, hold an image, generate a model, texture it, export it. Wire them in a line and the result of one becomes the input of the next. This guide starts at your first node and covers everything you can do today.
The canvas, the node, the pipeline
Three words cover most of it.
- The canvas is the workspace of one project. Hold Space to drag it around, or press H for the hand tool and V to go back to selecting.
- A node is one operation, drawn as a card. Inputs sit on its left edge, outputs on its right edge.
- A pipeline is a few nodes wired in order. Nothing runs by itself. You press Generate on a node, and that node runs.
That last point is what makes the canvas safe to explore. Adding nodes, wiring them, moving them and renaming them costs nothing and generates nothing. Your work stays in draft until you choose to run a step.
Saving is automatic. A few seconds after your last change, the project is stored. If your connection drops, the top bar tells you so and keeps your work locally until it can sync again.
Start from a ready made pipeline
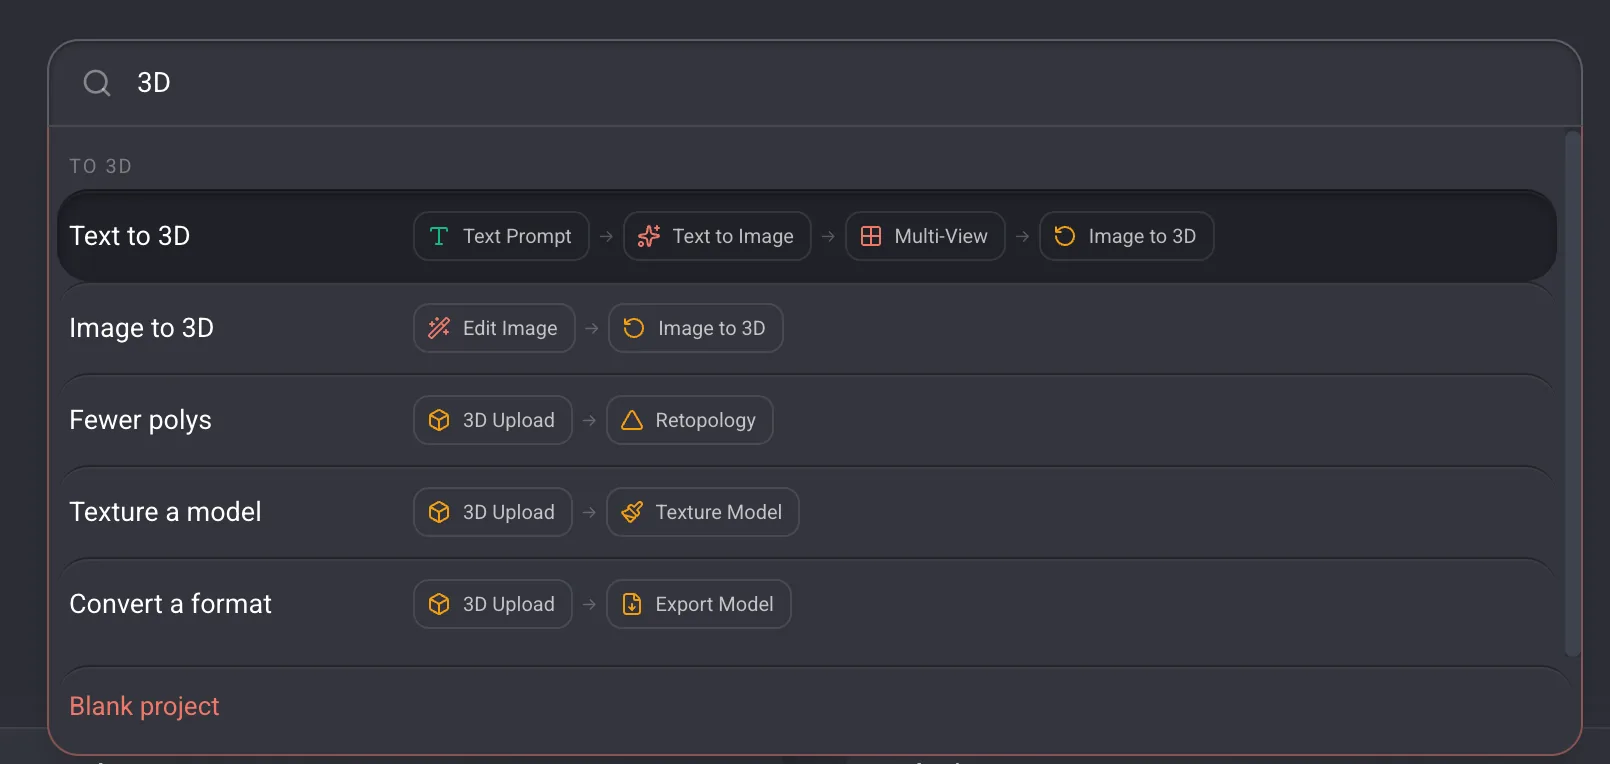
The fastest start is not an empty canvas. Open Home, and the field under the greeting opens a catalog of ready made pipelines, grouped by what you want to produce: to images, to 3D, characters and props, to video, and work on a model you already have.
- 1Type what you want, for example image to 3D or edit an image, or browse the list with the arrow keys.
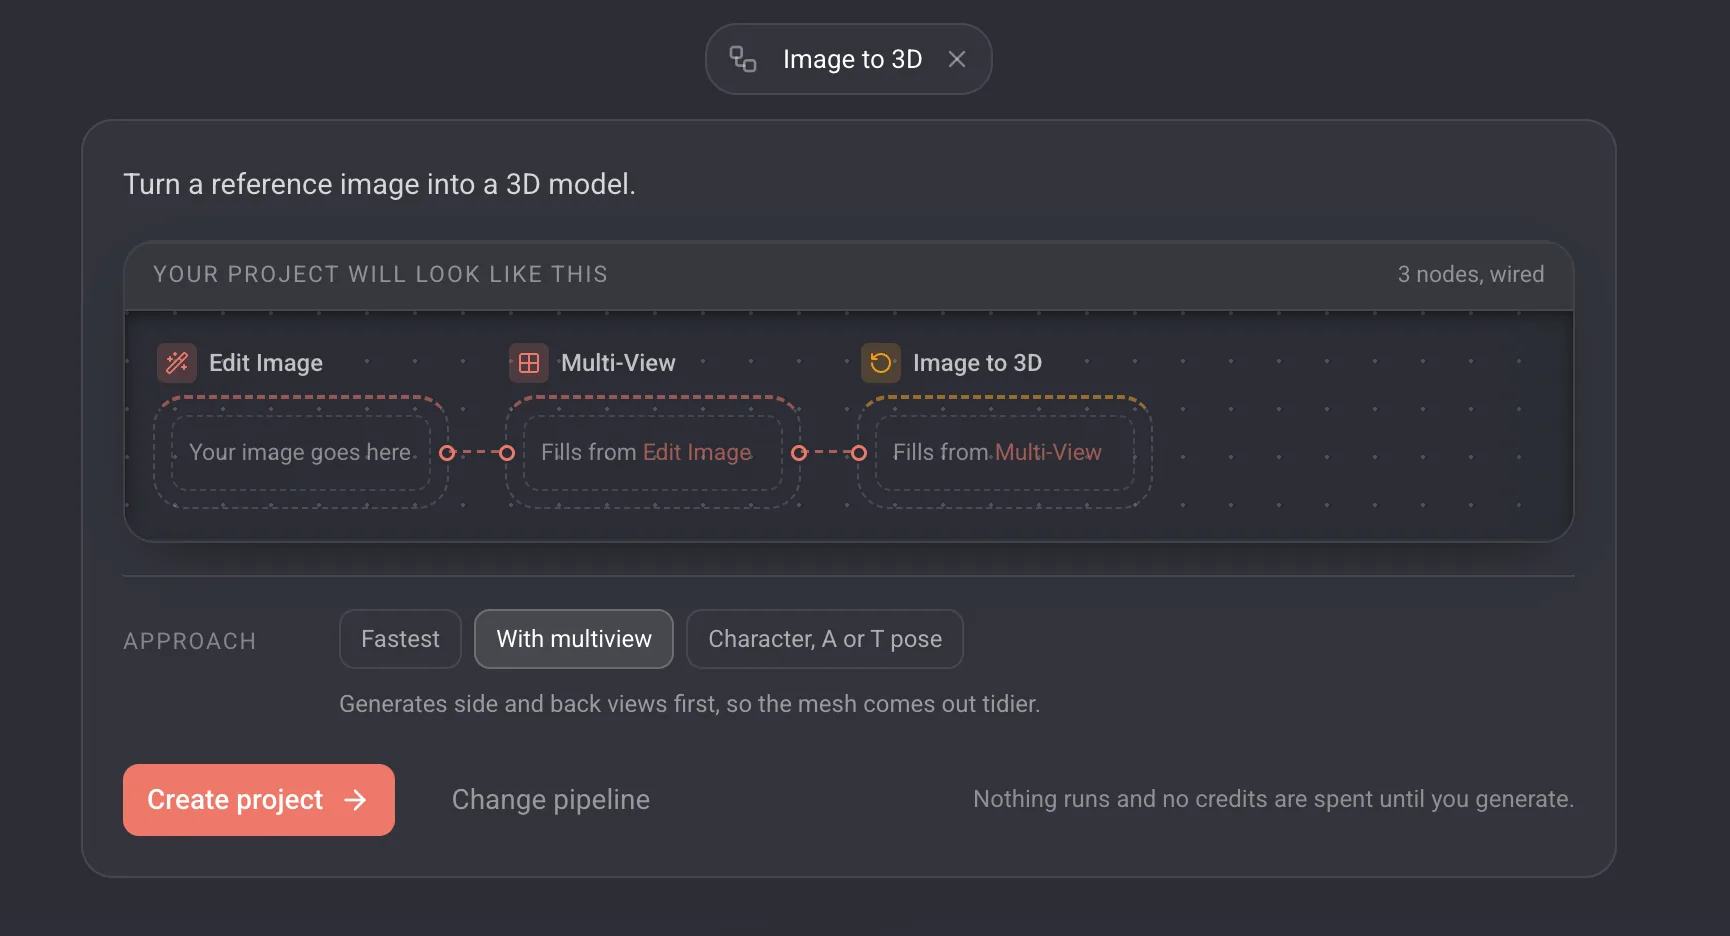
- 2Read the plan that replaces the list. It shows the exact nodes that will be placed, in order, and what the first one needs from you.
- 3Press Create canvas. The nodes arrive already wired and empty, with the first one selected and centered.
Some pipelines offer more than one route to the same result. Image to 3D lets you choose the fastest path, a route that generates extra views first so the mesh comes out tidier, or a route built for characters.
Ports and cables
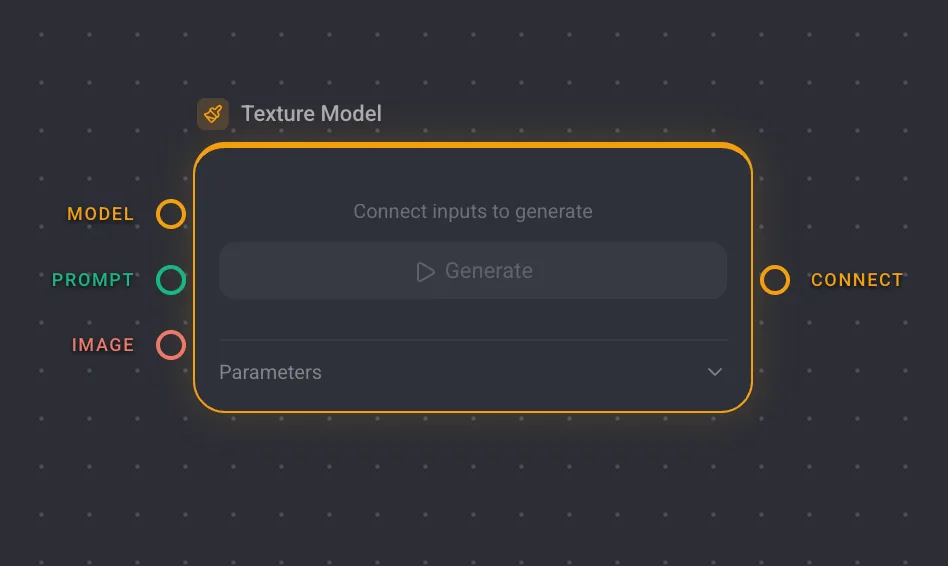
Every connection carries one of four kinds of data, and each kind has its own color on the ports: text, image, 3D and video. Drag from an output on the right of one node to an input on the left of another. If the two types do not match, the canvas refuses the connection, so a wrong cable is not something you can leave behind by accident.
- Some inputs accept several cables at once, such as the references of Image to Image, the views of Image to 3D, or the frames of Image to Video.
- Others accept exactly one. A second cable into a single input replaces the first instead of stacking, which is usually what you wanted.
Adding nodes, four ways
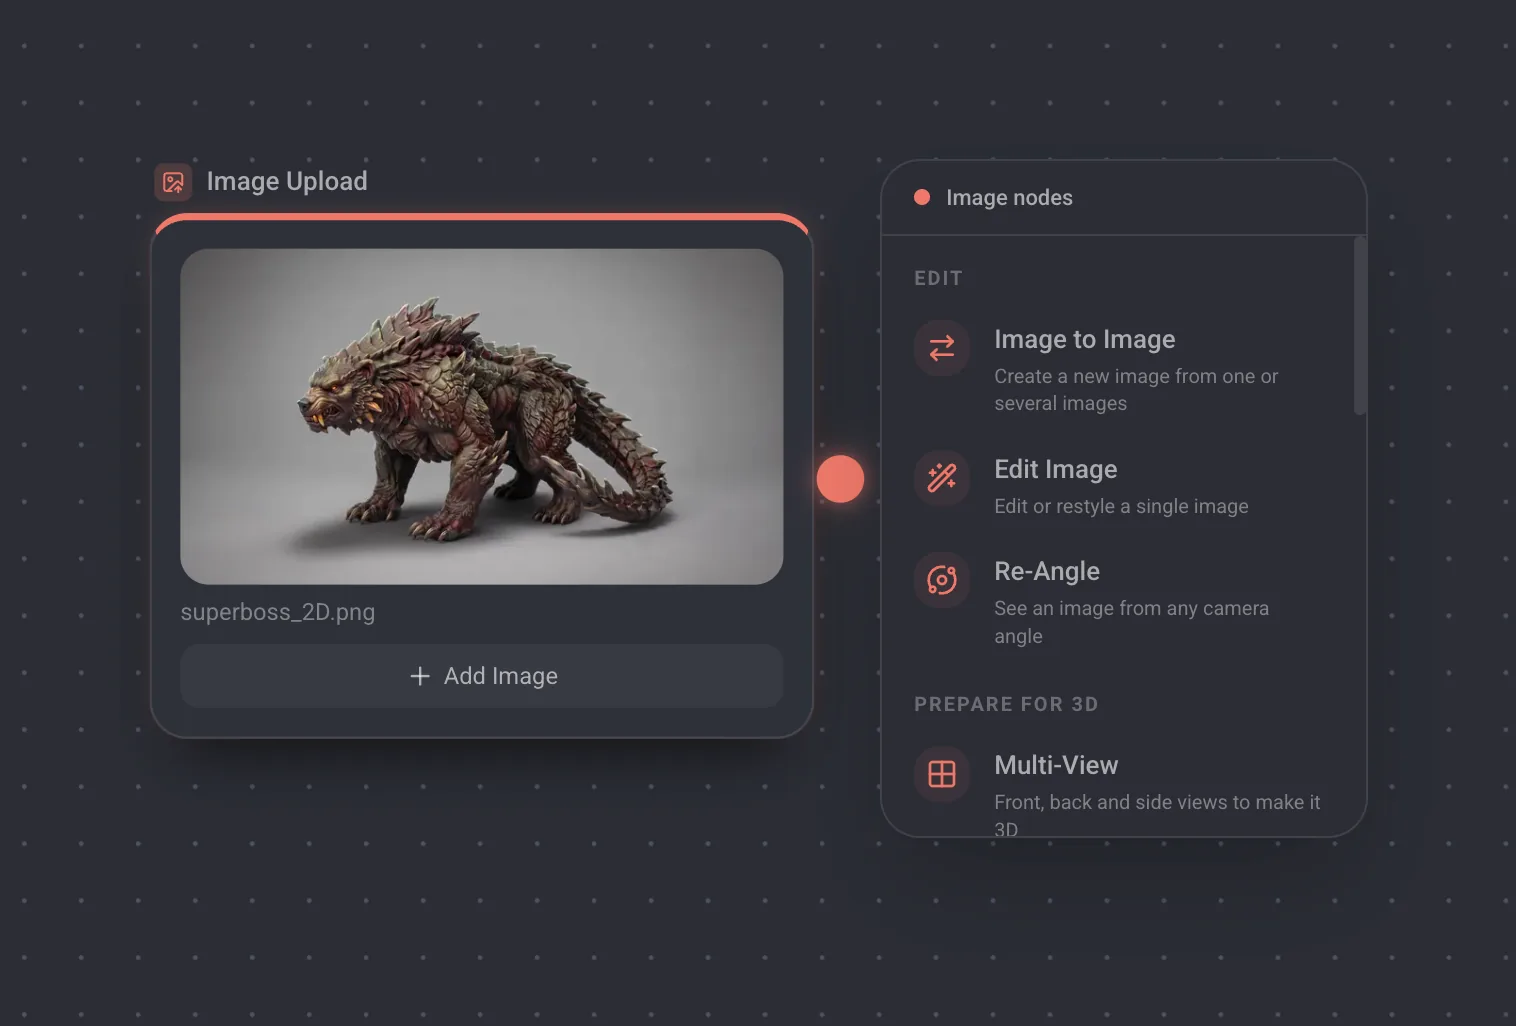
You will use the first of these far more than the others, because it is the only one that wires the new node for you.
- 1From a port. Hover a port and a plus button appears. Click it to get a menu of only the nodes that fit that port. Pick one and it arrives created and connected. Dragging a cable into empty canvas opens the same menu.
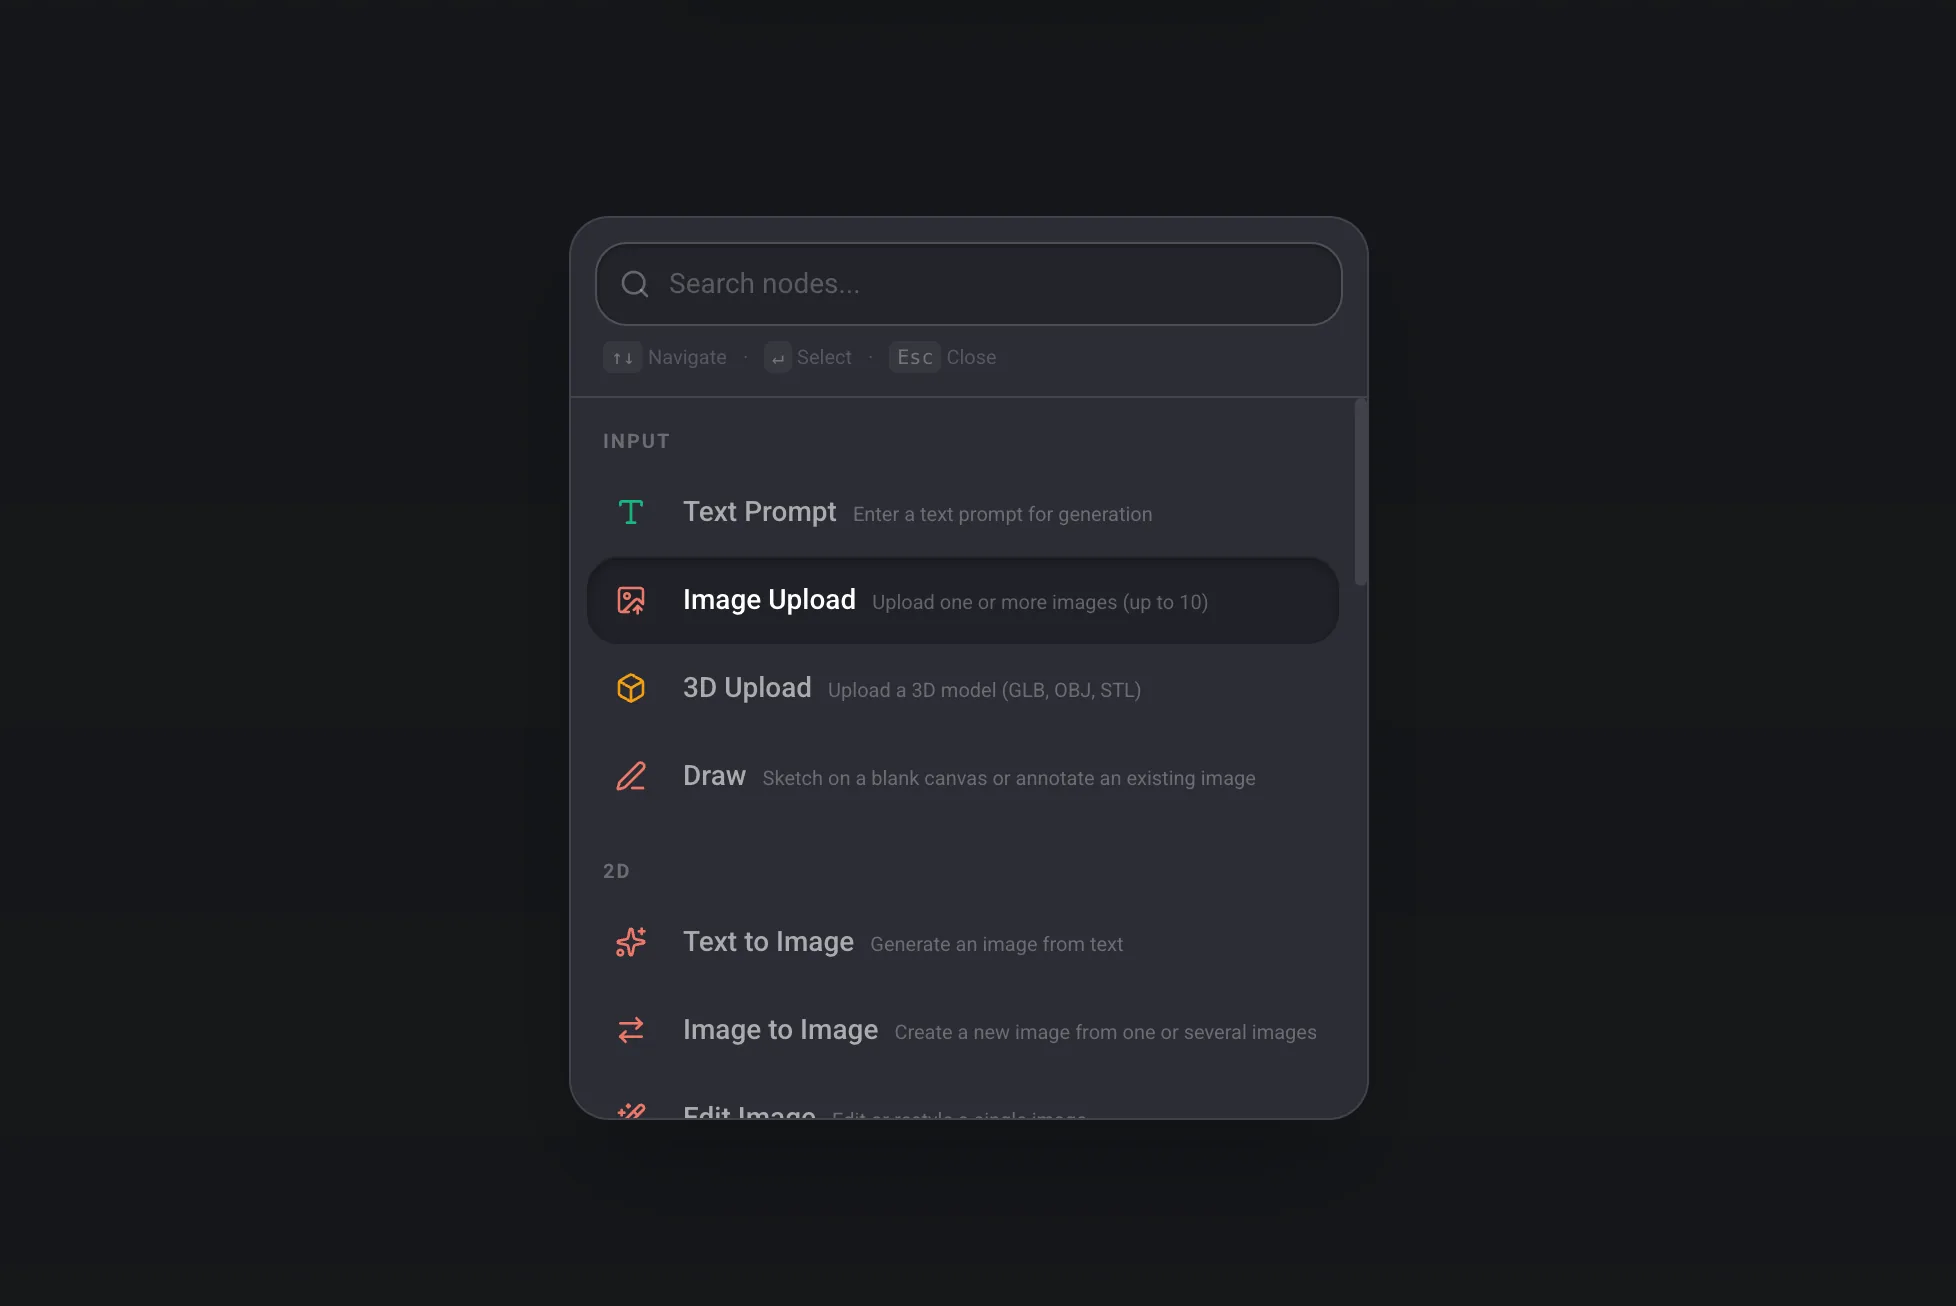
- 2By name. Press / and type. Good when you already know the node you want, for example Re-Angle or Retopology.
- 3From the palette. Right click empty canvas for the full list, grouped into Input, then 2D, 3D and Video, then Notes. CmdF opens the same list in the left panel with the search field focused.
- 4From your files. Drag images or a 3D file straight onto the canvas, or paste an image from your clipboard. Lychee creates the right upload node for you. Images can be PNG, JPEG or WebP, and models can be GLB, OBJ or STL.
When you drop several images at once, Lychee asks whether you want them combined into one node or split into separate nodes. Tick the remember box and it stops asking. You can change that answer later in Settings.
Run your first generation
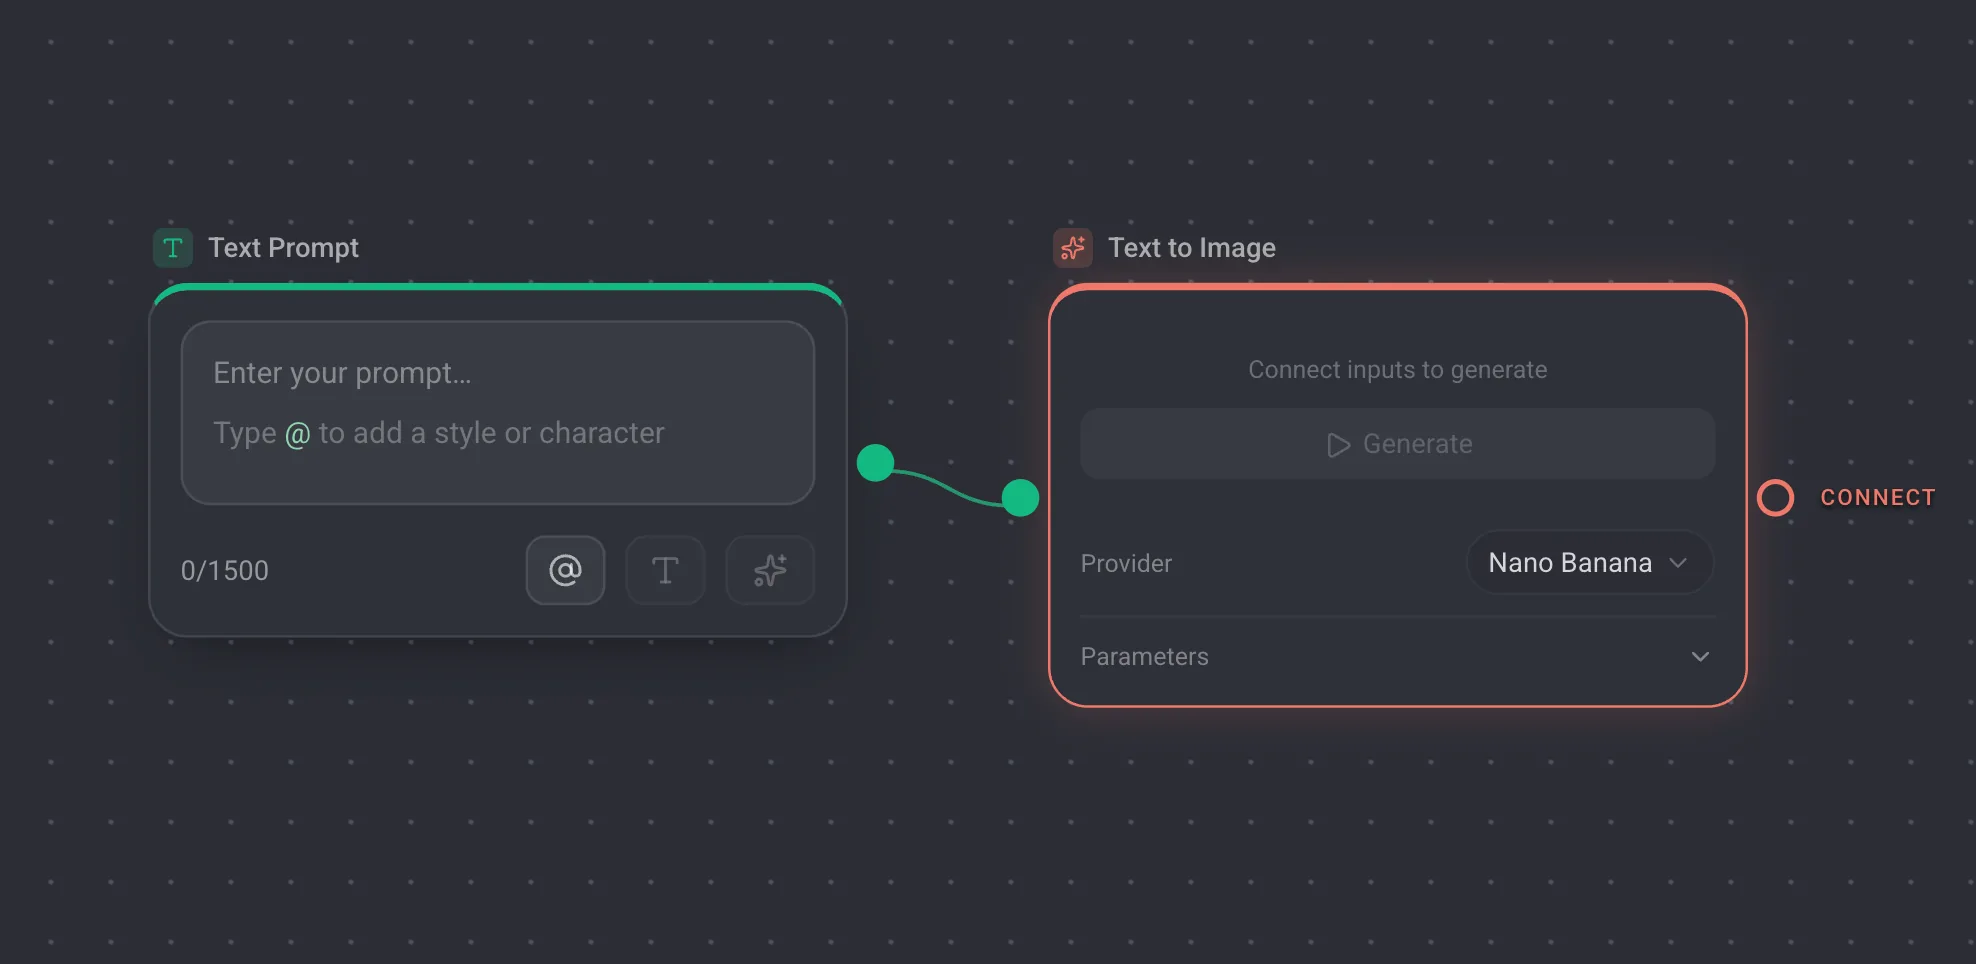
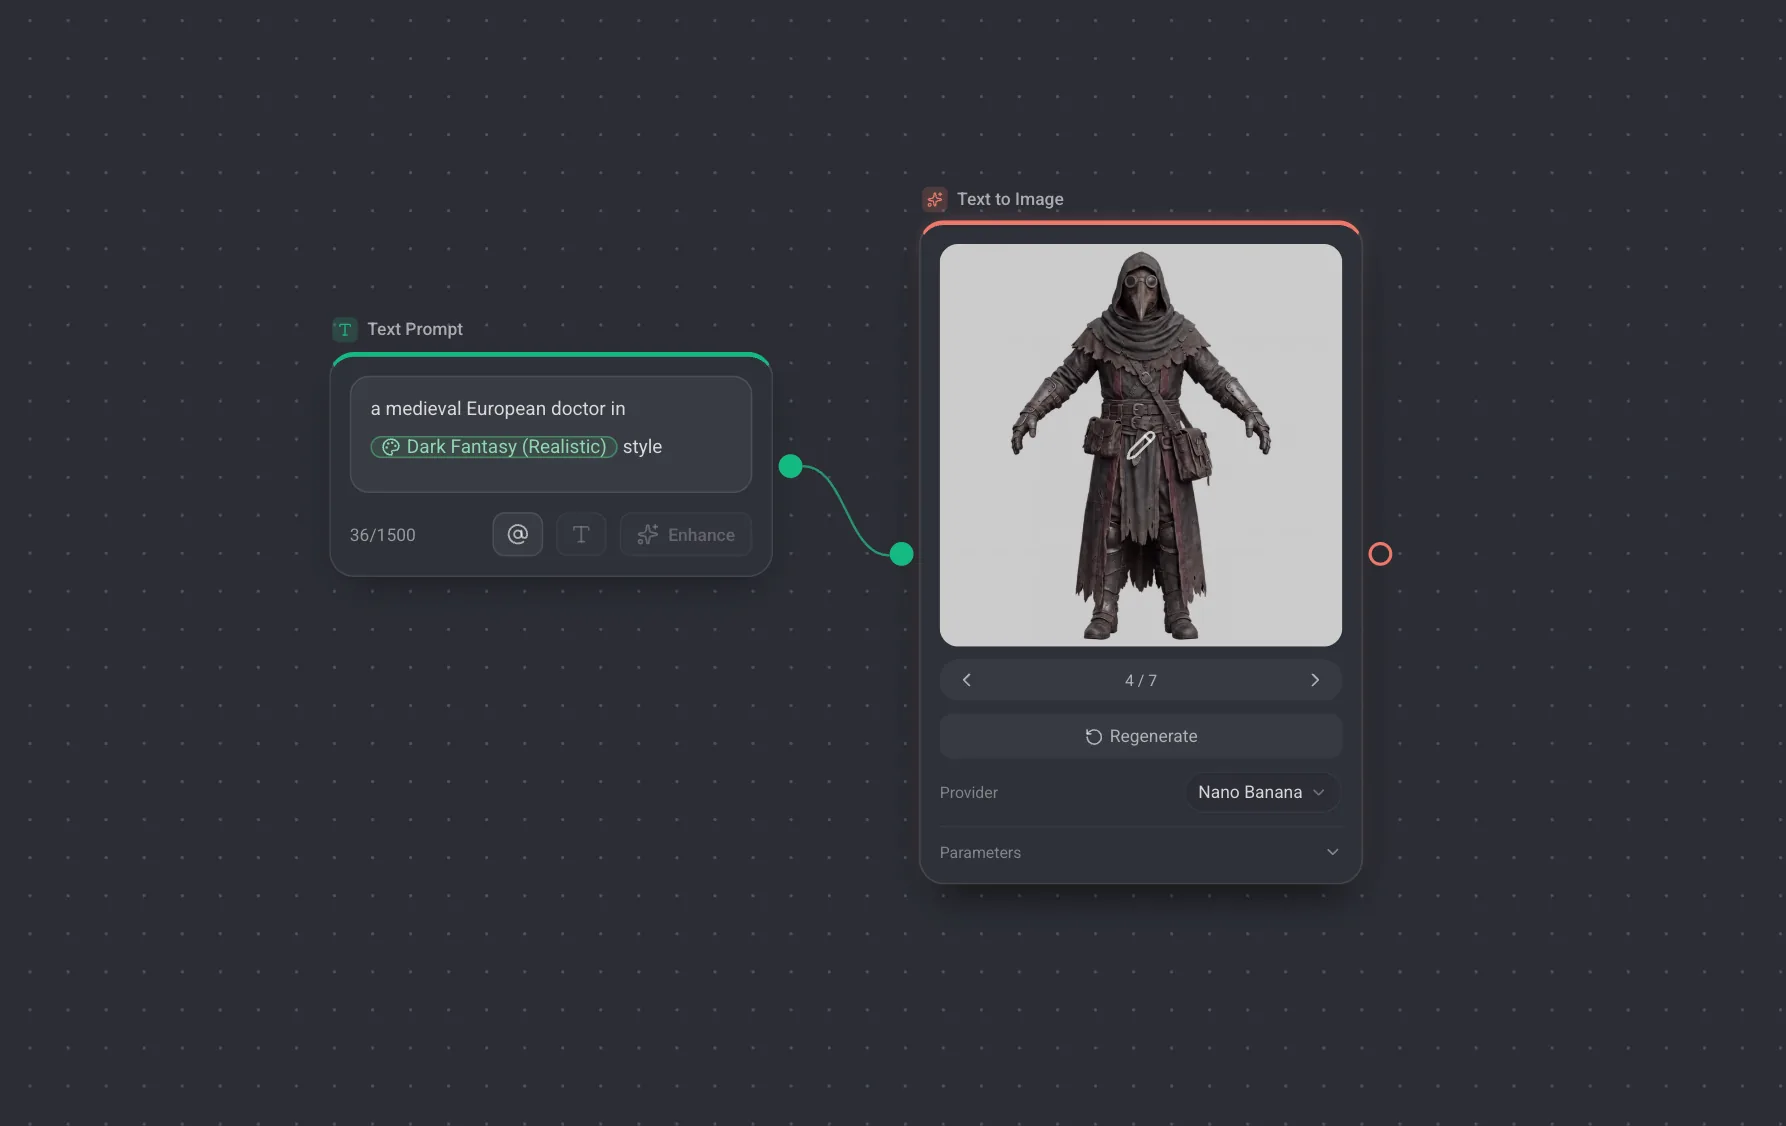
The shortest pipeline that produces something is a Text Prompt wired into a Text to Image. Here is the whole loop.
- 1Click into the Text Prompt node and describe what you want. Plain sentences work.
- 2Select the Text to Image node and press its Generate button, or press CmdEnter with the node selected.
- 3Wait. The node shows its own progress, so you can keep working elsewhere on the canvas while it runs.
- 4Every result lives in its node. From there, regenerate it, edit it full screen, download it, or wire it into what comes next.
Every prompt field has an Enhance toggle. It rewrites a short prompt into a fuller one before you run, and you can always show the original again.
Node settings
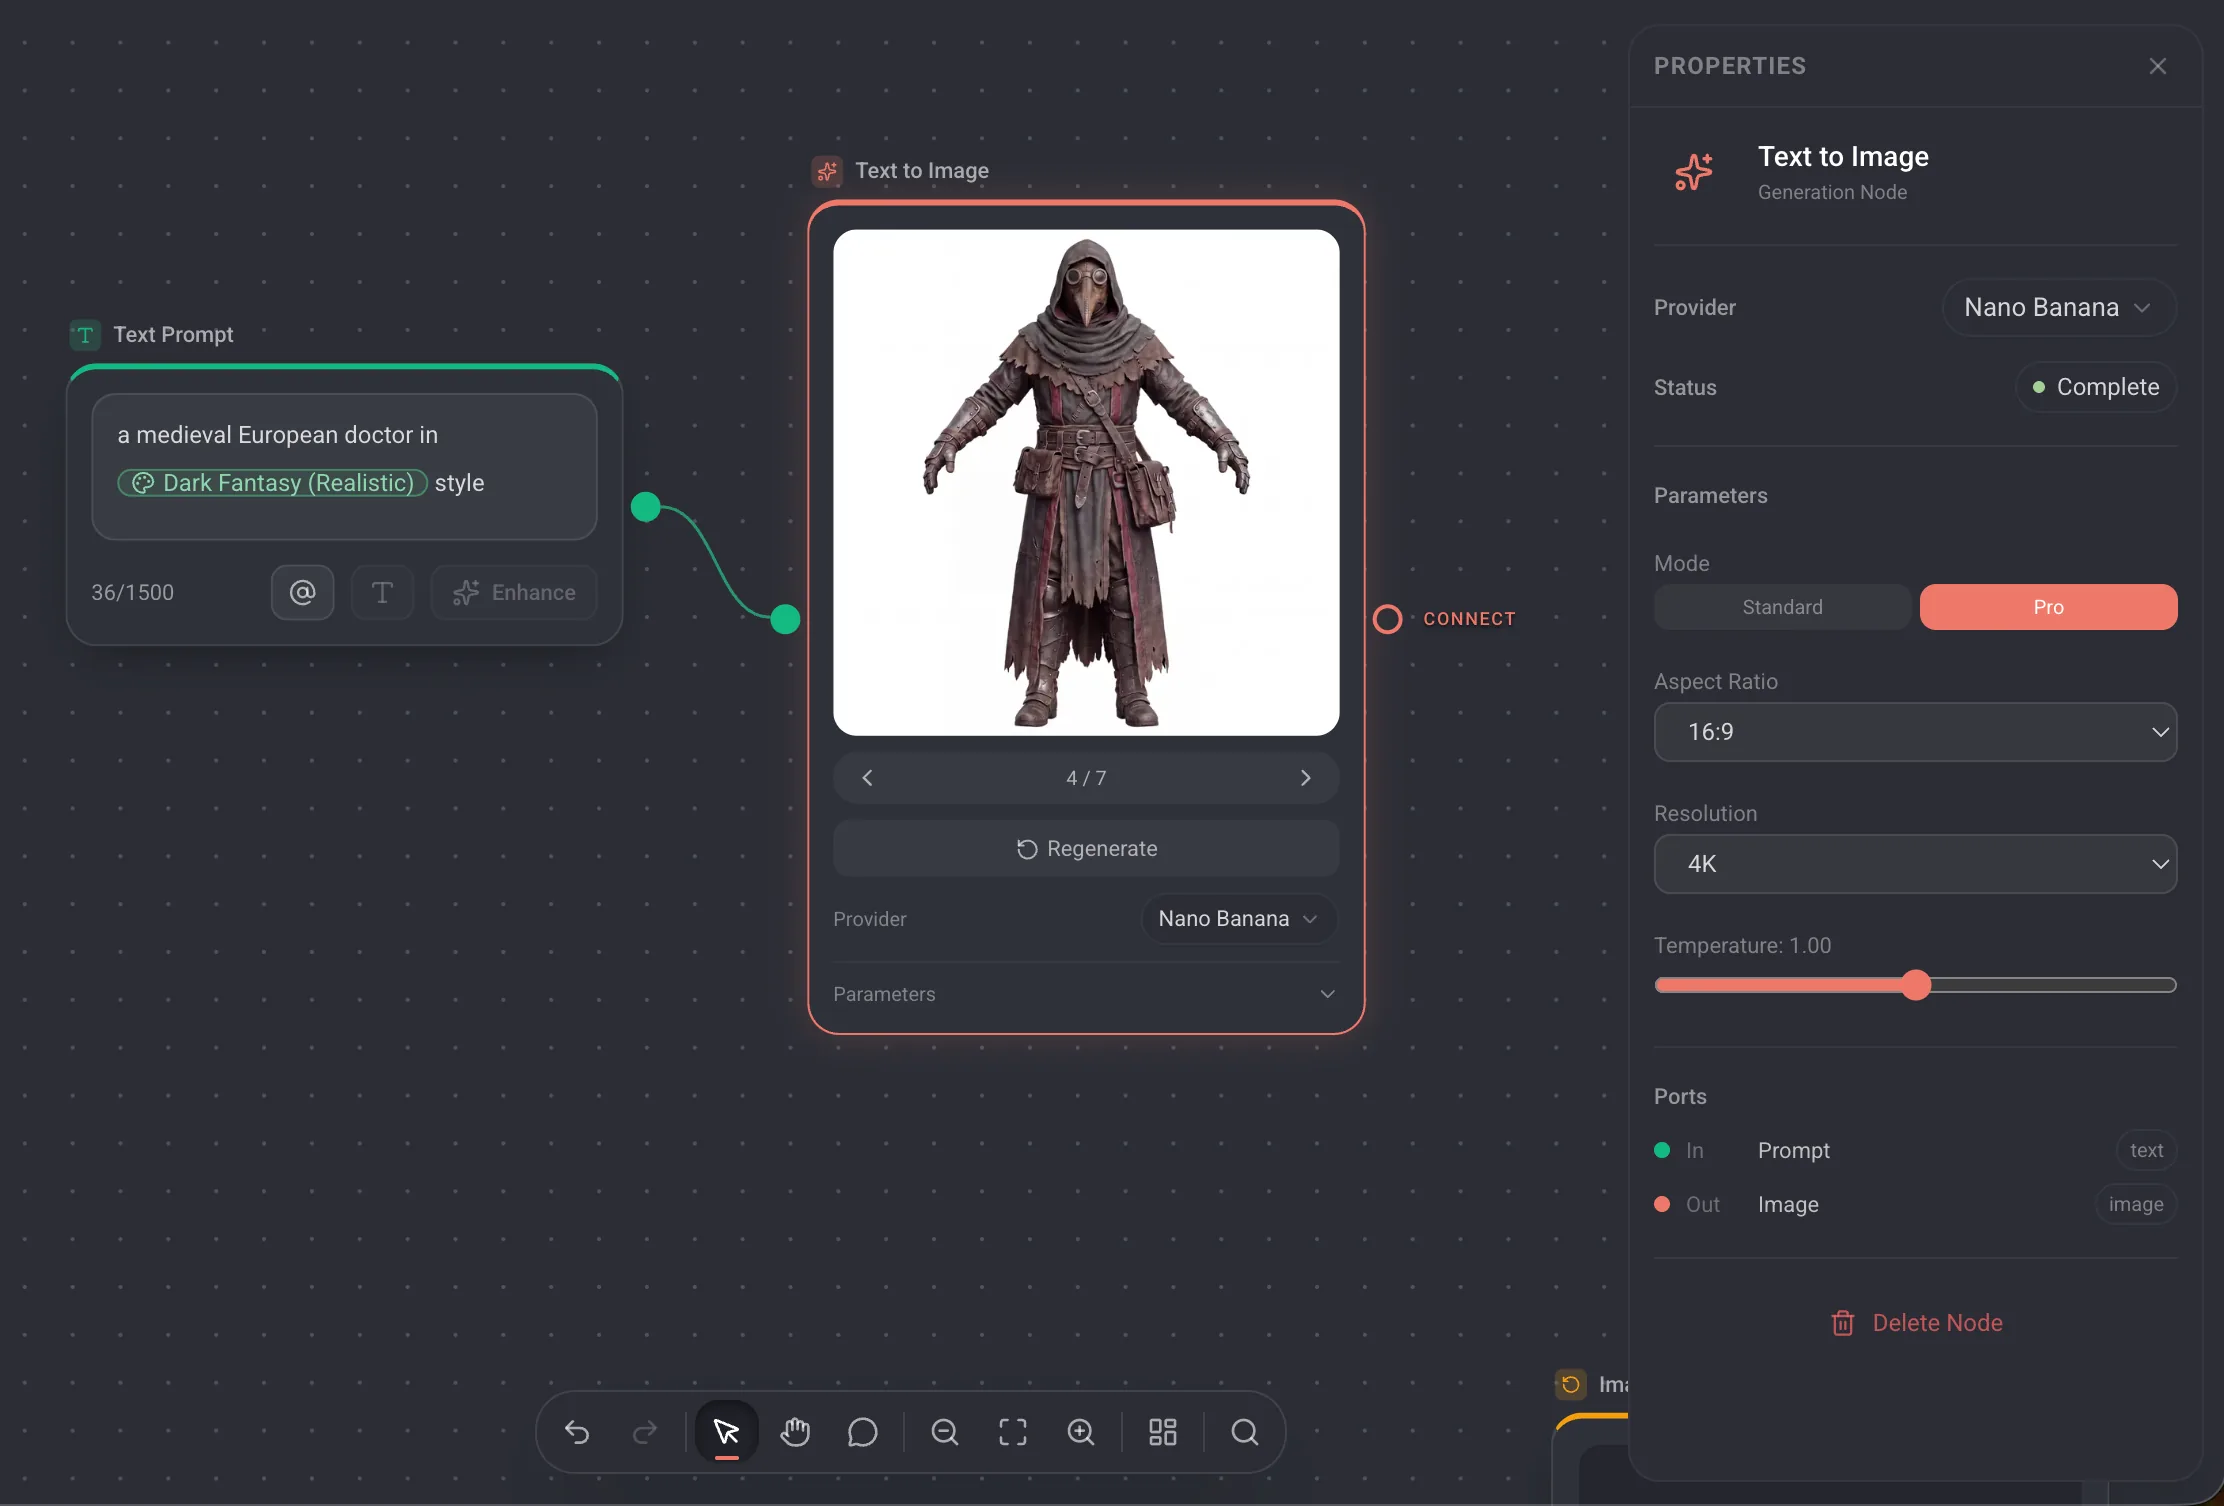
Select a node and its settings open in the panel on the right. What you find there depends on the node, and this is where most of the quality of a result is decided.
- Image nodes let you pick the model provider, currently Nano Banana or GPT Image 2, plus aspect ratio and output size.
- 3D nodes run on Tripo3D and expose geometry quality, a face limit, and whether to generate texture and PBR maps.
- Video nodes run on Google Veo, or Seedance for Reference to Video, with resolution, duration and aspect ratio.
- A few nodes keep their controls inside the card, because the controls are the node: the camera angles of Re-Angle, and the per view angles of Multi-View.
The panel also holds the prompt in a larger field, a copy button for it, and the Delete Node action at the bottom. To rename a node, double click its title in the card header.
Every node, family by family
Four families, plus notes.
Input nodes: what you bring
Input nodes never generate anything and never cost credits. They hold the material you provide and hand it to the nodes downstream.
| Node | Takes | Gives | Reach for it when |
|---|---|---|---|
| Text Prompt | Your words | Text | Your starting point is an idea in words. Write your prompt once, then feed it into any node with a text input. |
| Image Upload | Up to 10 files from your machine | Image | You start from an existing visual: a reference, a photo, a render. Feed it into any node with an image input. |
| 3D Upload | A GLB, OBJ or STL file | 3D | The model already exists and you want to texture, simplify, restyle or convert it |
| Draw | Your strokes, on a blank sheet or over an image | Image | You want to sketch an idea or mark up a reference without leaving the canvas |
Text Prompt
- Takes
- Your words
- Gives
- Text
- Use
- Your starting point is an idea in words. Write your prompt once, then feed it into any node with a text input.
Image Upload
- Takes
- Up to 10 files from your machine
- Gives
- Image
- Use
- You start from an existing visual: a reference, a photo, a render. Feed it into any node with an image input.
3D Upload
- Takes
- A GLB, OBJ or STL file
- Gives
- 3D
- Use
- The model already exists and you want to texture, simplify, restyle or convert it
Draw
- Takes
- Your strokes, on a blank sheet or over an image
- Gives
- Image
- Use
- You want to sketch an idea or mark up a reference without leaving the canvas
2D nodes: images
| Node | Takes | Gives | Reach for it when |
|---|---|---|---|
| Text to Image | A prompt | Image | You need a first concept from words alone |
| Image to Image | A prompt and one or more images | Image | You want to combine several references into one new image |
| Edit Image | One image, wired in or dropped into the node | Image | You want one targeted change, not a new image. Paint the area to edit and tell the node what to do there. |
| Re-Angle | One image | Image | Same subject, different camera angle |
| Multi-View | One image | Four views | You are about to send an object into 3D |
| Character Sheet | One character image | Four clean views, A pose or T pose | The subject is a person or a creature |
| Props Extraction | A character image or an inspiration board | One node per prop it finds | You want to break a character or inspiration board into its parts. Every sword, boot, and buckle comes out as its own node. |
| Prop Variations | A prop image | Style matched variants | You need the same object in several flavors |
| Sketch to Image | A sketch | Image | You want a rendered image out of a rough drawing |
Text to Image
- Takes
- A prompt
- Gives
- Image
- Use
- You need a first concept from words alone
Image to Image
- Takes
- A prompt and one or more images
- Gives
- Image
- Use
- You want to combine several references into one new image
Edit Image
- Takes
- One image, wired in or dropped into the node
- Gives
- Image
- Use
- You want one targeted change, not a new image. Paint the area to edit and tell the node what to do there.
Re-Angle
- Takes
- One image
- Gives
- Image
- Use
- Same subject, different camera angle
Multi-View
- Takes
- One image
- Gives
- Four views
- Use
- You are about to send an object into 3D
Character Sheet
- Takes
- One character image
- Gives
- Four clean views, A pose or T pose
- Use
- The subject is a person or a creature
Props Extraction
- Takes
- A character image or an inspiration board
- Gives
- One node per prop it finds
- Use
- You want to break a character or inspiration board into its parts. Every sword, boot, and buckle comes out as its own node.
Prop Variations
- Takes
- A prop image
- Gives
- Style matched variants
- Use
- You need the same object in several flavors
Sketch to Image
- Takes
- A sketch
- Gives
- Image
- Use
- You want a rendered image out of a rough drawing
3D nodes: models
| Node | Takes | Gives | Reach for it when |
|---|---|---|---|
| Image to 3D | One image, or a set of views | 3D model | This is the main road into 3D |
| Text to 3D | A prompt | 3D model | You want a shape straight from words, with no image step |
| Texture Model | A model, plus a prompt and reference images | Textured model | The shape is right and the surface is not |
| Retopology | A model | Model with fewer polygons | The mesh is too heavy for your game engine or your printer |
| Stylize Model | A model | Restyled model | You want a stylized pass, for example blocky bricks |
| Export Model | A model | FBX, OBJ, USDZ, STL or 3MF | Your model is ready to leave the canvas. Convert it to the format your engine, DCC tool or slicer expects. |
Image to 3D
- Takes
- One image, or a set of views
- Gives
- 3D model
- Use
- This is the main road into 3D
Text to 3D
- Takes
- A prompt
- Gives
- 3D model
- Use
- You want a shape straight from words, with no image step
Texture Model
- Takes
- A model, plus a prompt and reference images
- Gives
- Textured model
- Use
- The shape is right and the surface is not
Retopology
- Takes
- A model
- Gives
- Model with fewer polygons
- Use
- The mesh is too heavy for your game engine or your printer
Stylize Model
- Takes
- A model
- Gives
- Restyled model
- Use
- You want a stylized pass, for example blocky bricks
Export Model
- Takes
- A model
- Gives
- FBX, OBJ, USDZ, STL or 3MF
- Use
- Your model is ready to leave the canvas. Convert it to the format your engine, DCC tool or slicer expects.
Video nodes: shots
| Node | Takes | Gives | Reach for it when |
|---|---|---|---|
| Text to Video | A prompt, with optional reference images | Video | You want a shot from a description |
| Image to Video | A prompt and one or two frames | Video | You have a still and you want it to move |
| Reference to Video | A prompt, up to 9 images and 3 videos | Video | The shot has to follow specific references closely |
| Extend Video | A video generated here, plus a prompt | A longer video | The shot ends too early |
Text to Video
- Takes
- A prompt, with optional reference images
- Gives
- Video
- Use
- You want a shot from a description
Image to Video
- Takes
- A prompt and one or two frames
- Gives
- Video
- Use
- You have a still and you want it to move
Reference to Video
- Takes
- A prompt, up to 9 images and 3 videos
- Gives
- Video
- Use
- The shot has to follow specific references closely
Extend Video
- Takes
- A video generated here, plus a prompt
- Gives
- A longer video
- Use
- The shot ends too early
Extend Video only accepts a video generated inside Lychee Studio, because it continues from that generation rather than from a file.
Notes
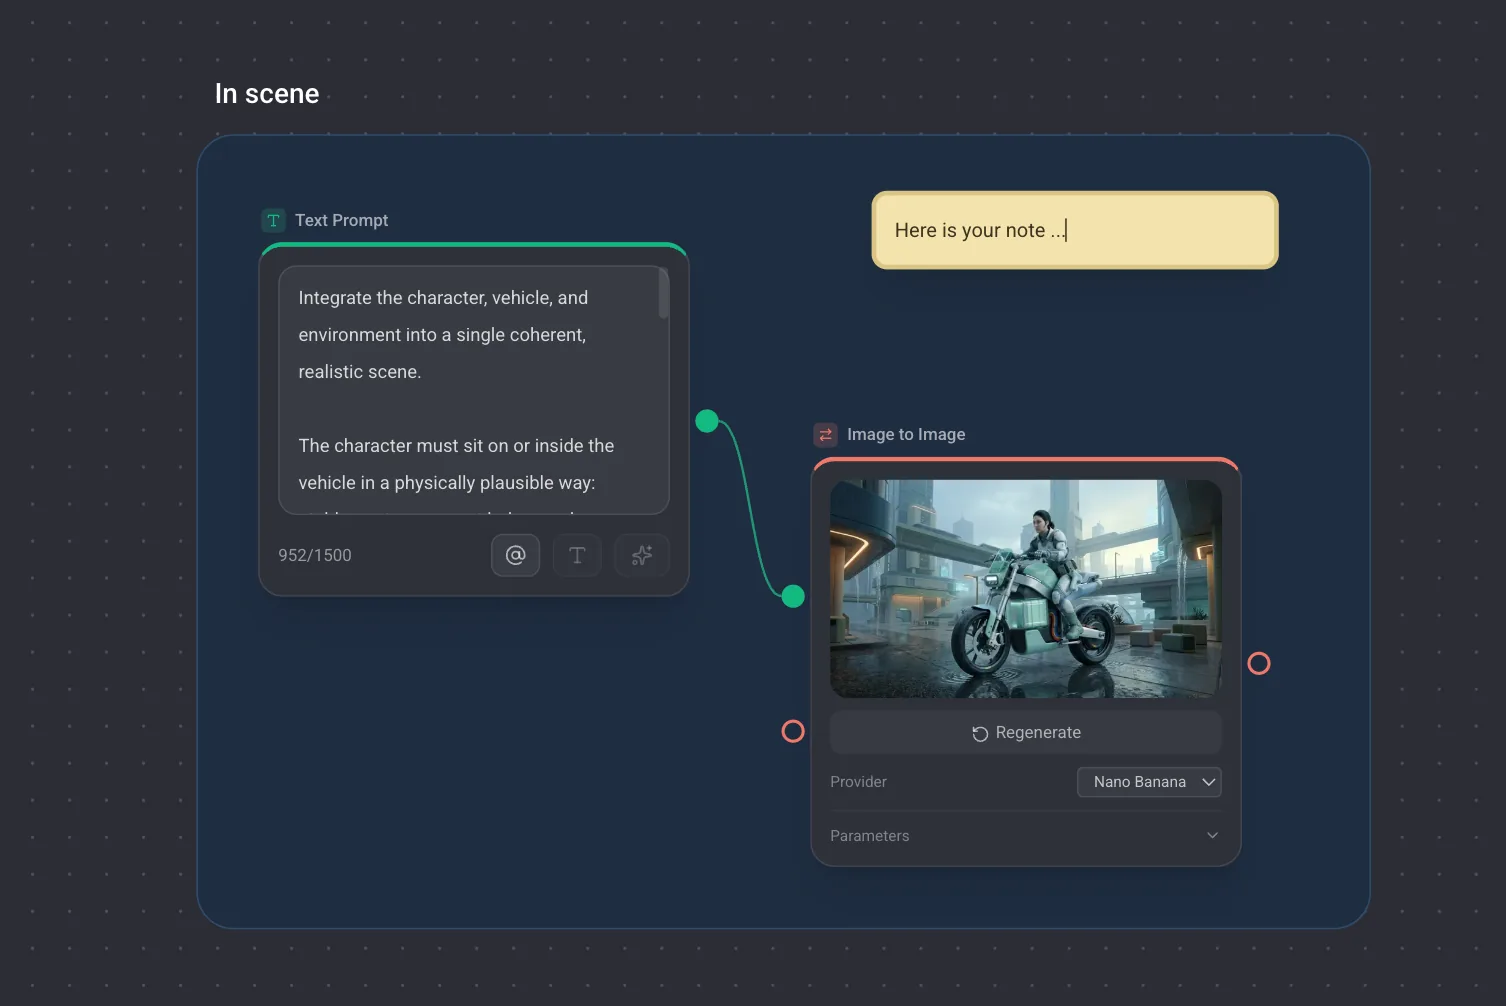
The Note node has no ports and never runs. Pin one next to a group of nodes to say what the branch is for.
Prepare views before you go 3D
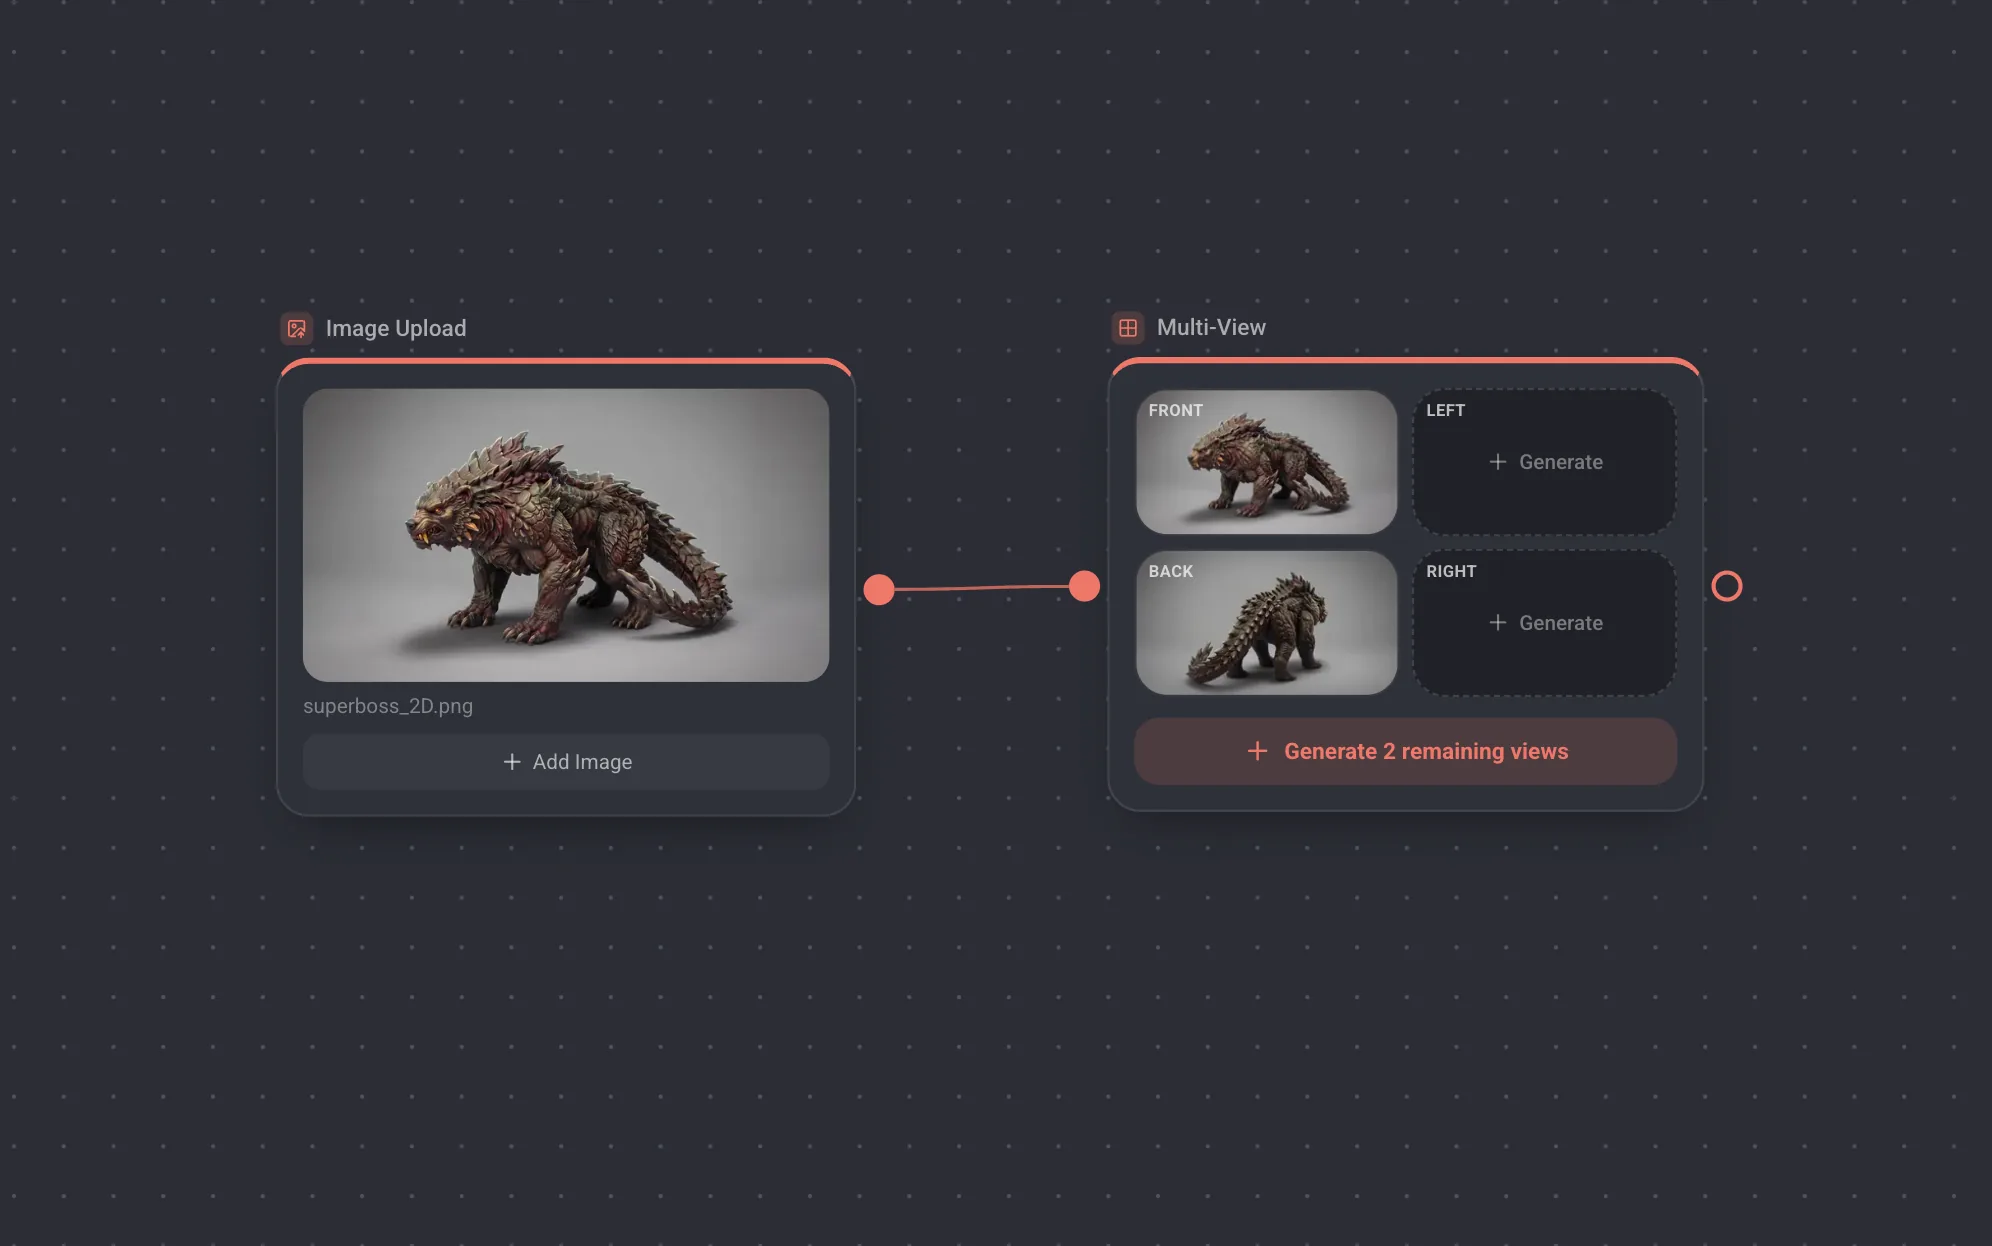
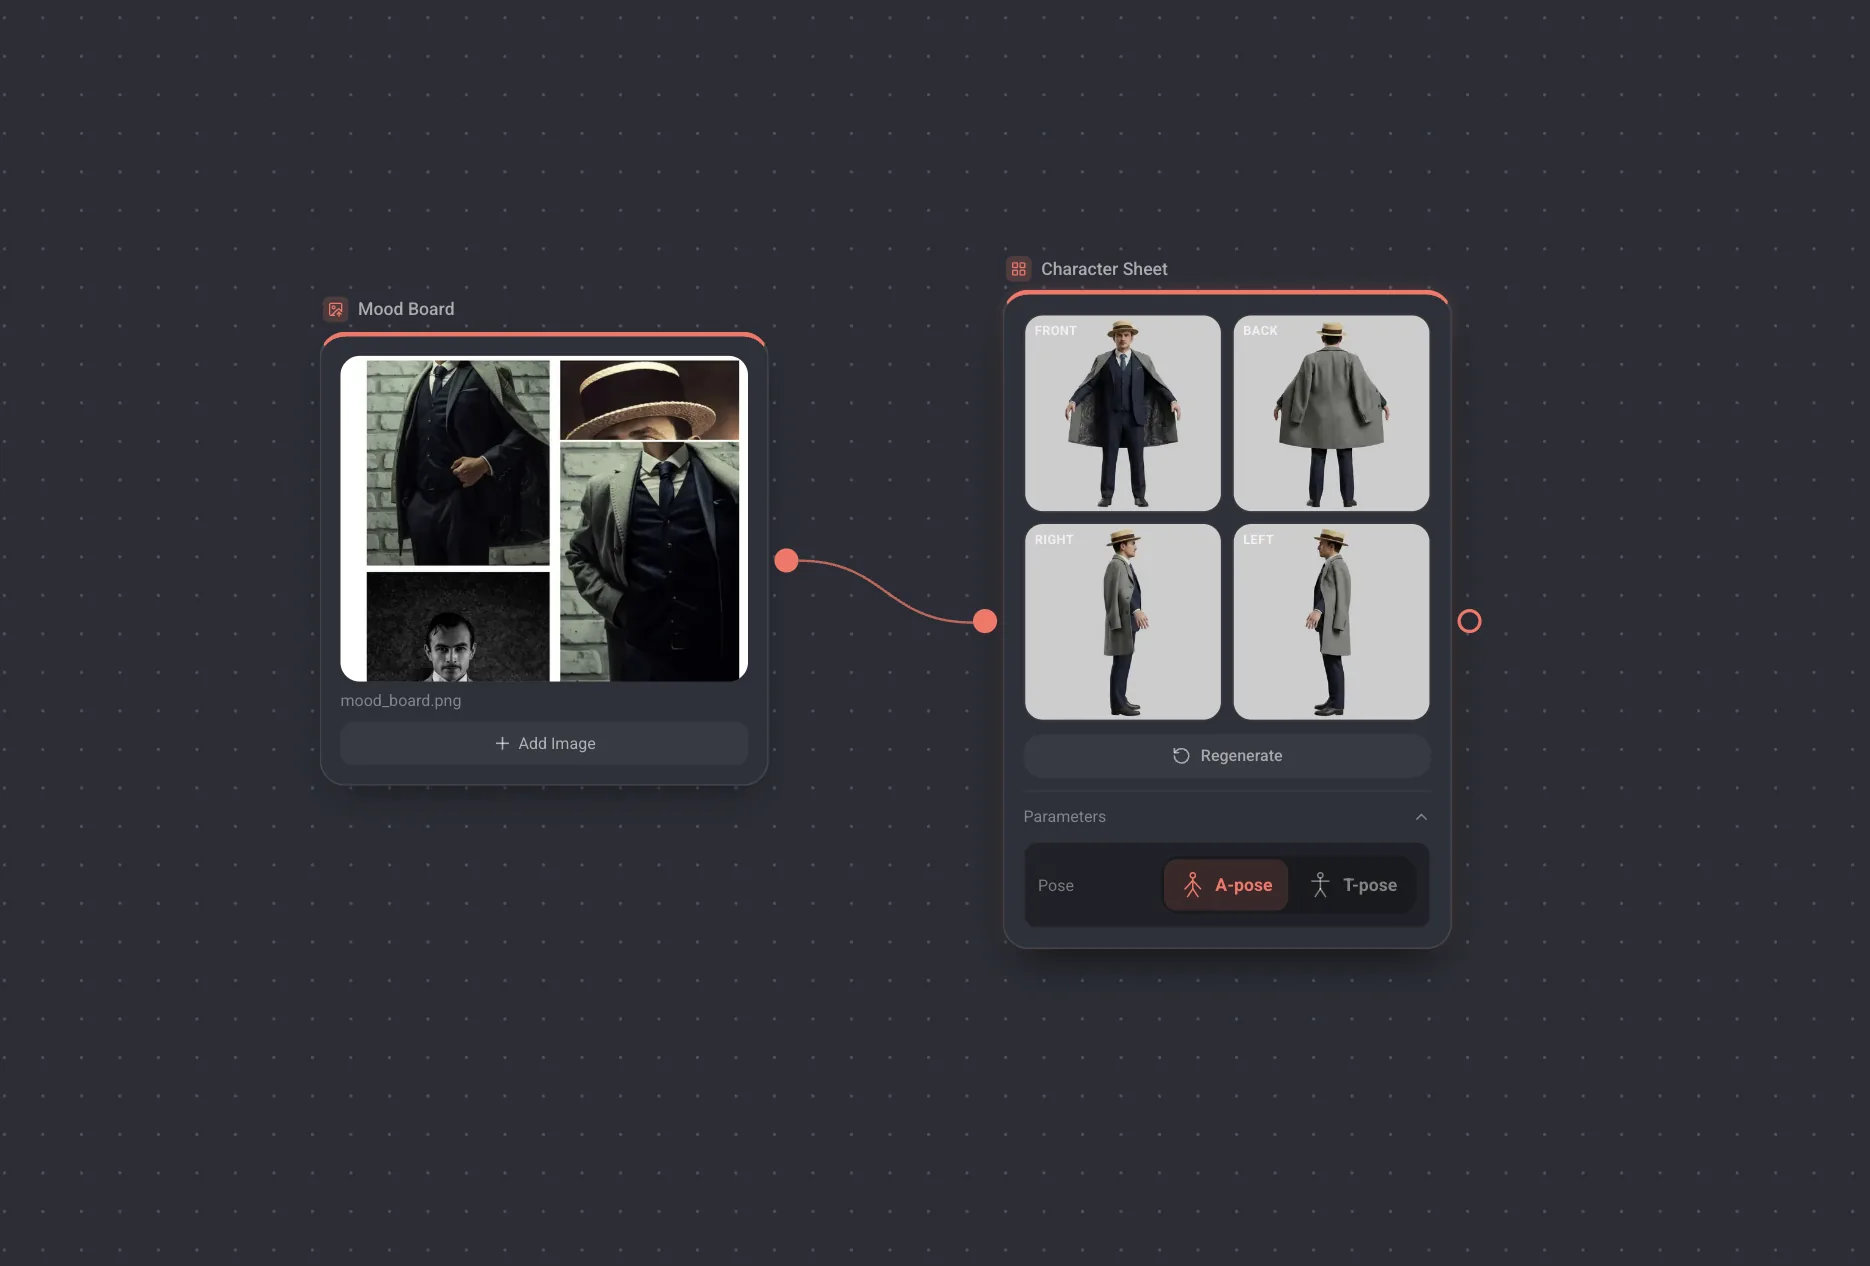
A single image shows a model generator only one side of your subject, so it has to invent the rest. Giving it more views is the biggest single improvement you can make to a 3D result. Two nodes do that, and they are not interchangeable.
- Multi-View keeps your image as the front and generates the left, back and right views around it. Each slot has its own angle you can adjust, and each can be regenerated on its own until it is right. Use it for objects and props.
- Character Sheet produces four clean views of a character in A pose or T pose, the layout a model generator reads best for a body. Use it for people and creatures.
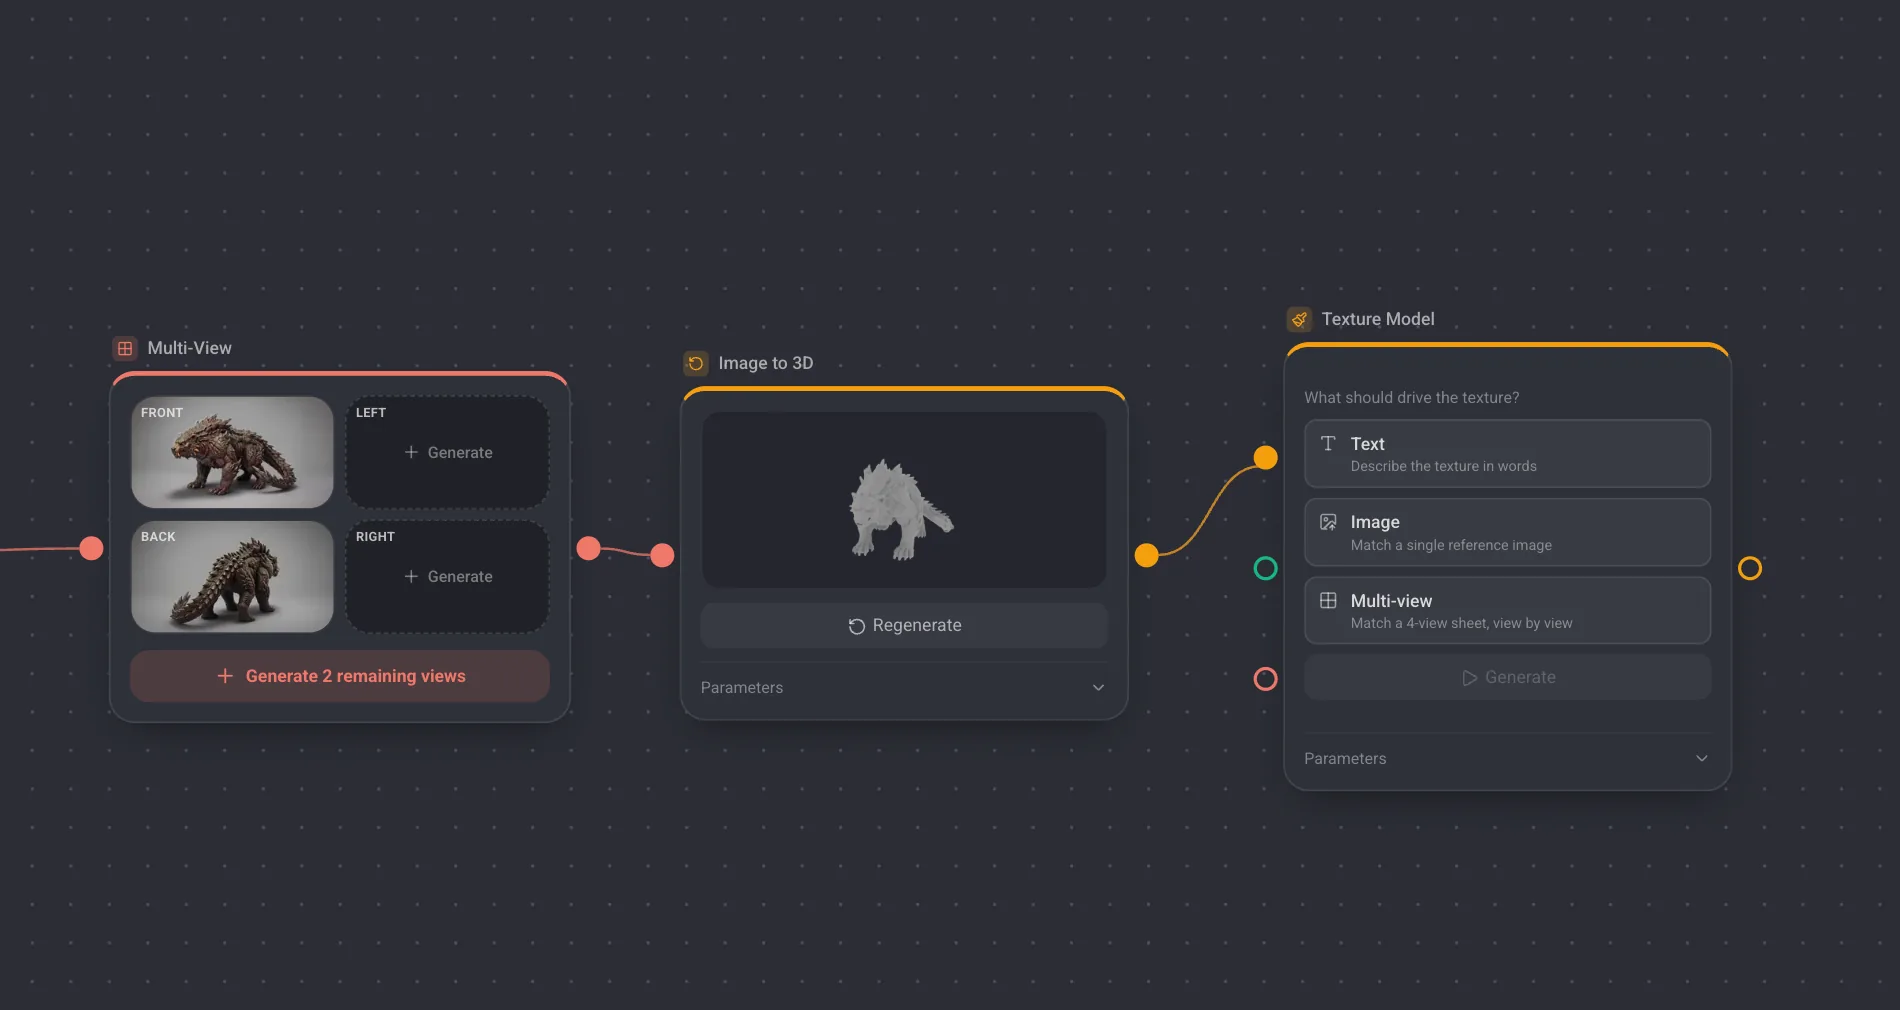
Wire either one into Image to 3D. The generator sees that it received a set of views rather than a single picture, and reconstructs from all of them.
From image to model, then finishing
- 1Wire your image, or your set of views, into Image to 3D.
- 2Open the properties panel and set geometry quality, a face limit and whether you want texture and PBR maps.
- 3Press Generate. A model takes noticeably longer than an image, and the node keeps you posted while it works.
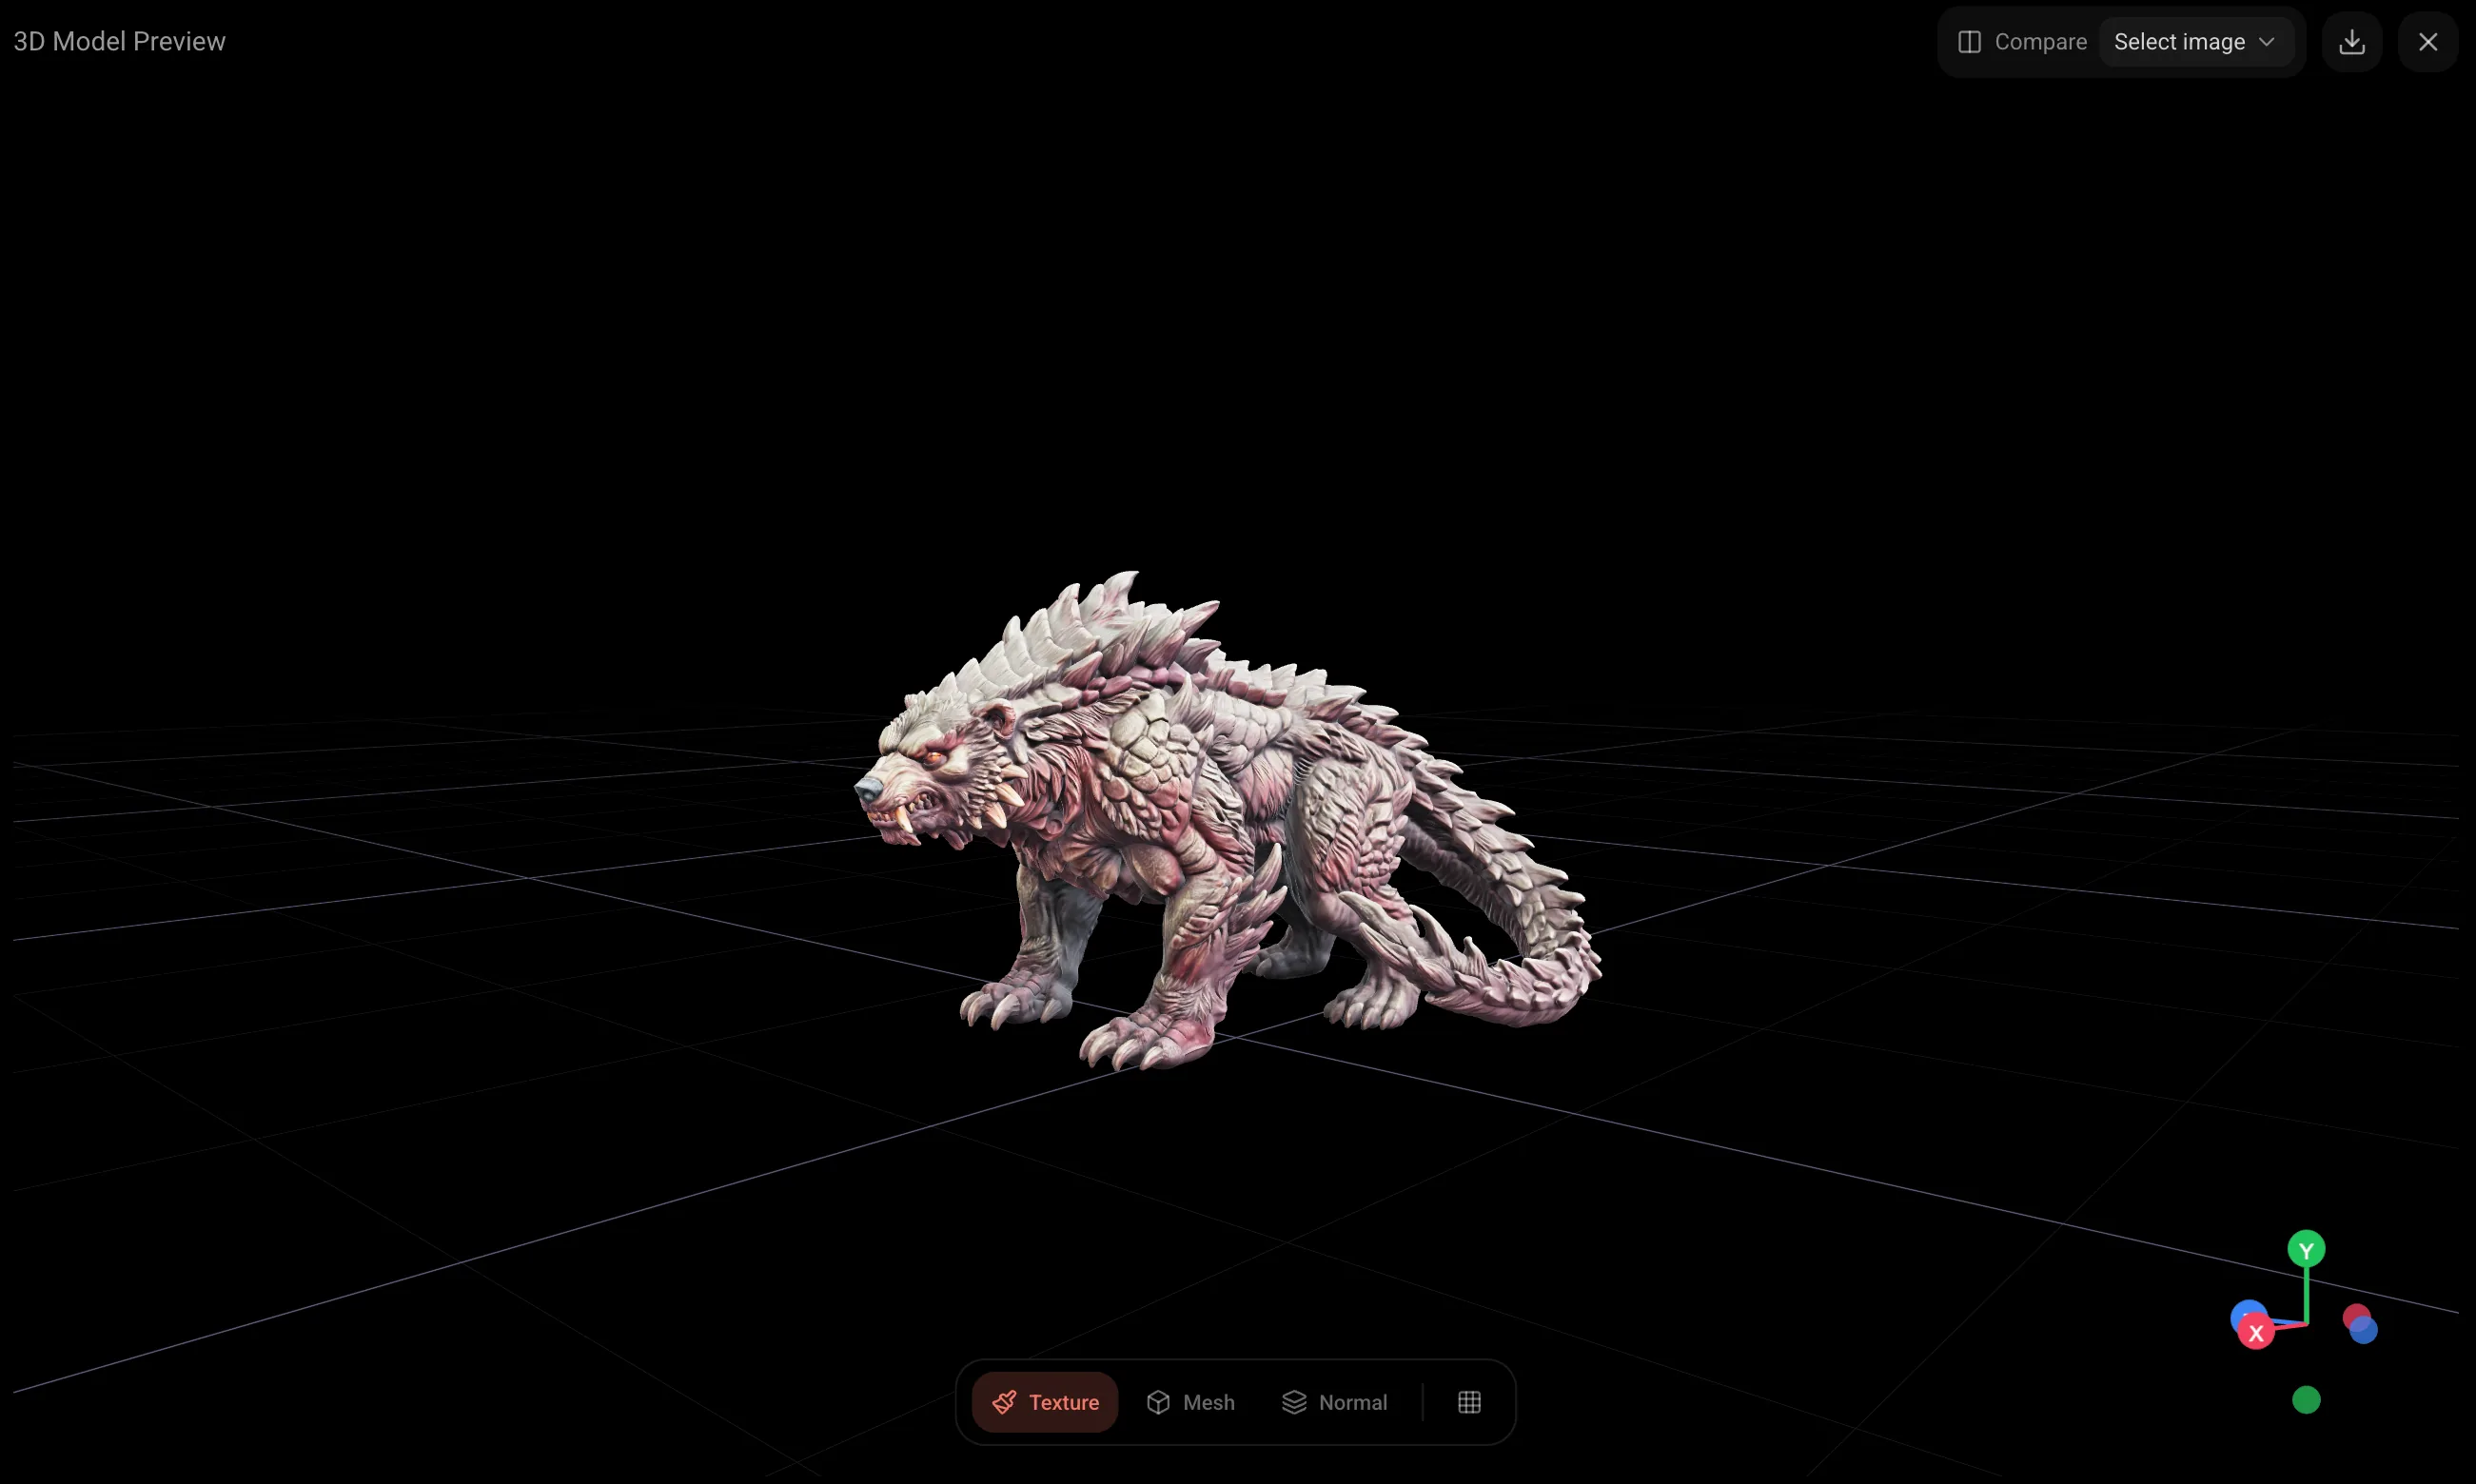
- 4Orbit the result inside the node, or open it full screen to inspect it with texture, plain mesh and normal shading, with the wireframe overlaid.
From that model output you can keep going in the same canvas. Texture Model repaints it, Retopology brings the polygon count down, Stylize Model gives it a different look, and Export Model writes the file format your other tool expects. Each one is a new node fed by the previous result, so nothing you already generated is thrown away.
Pull props out of a character or a scene
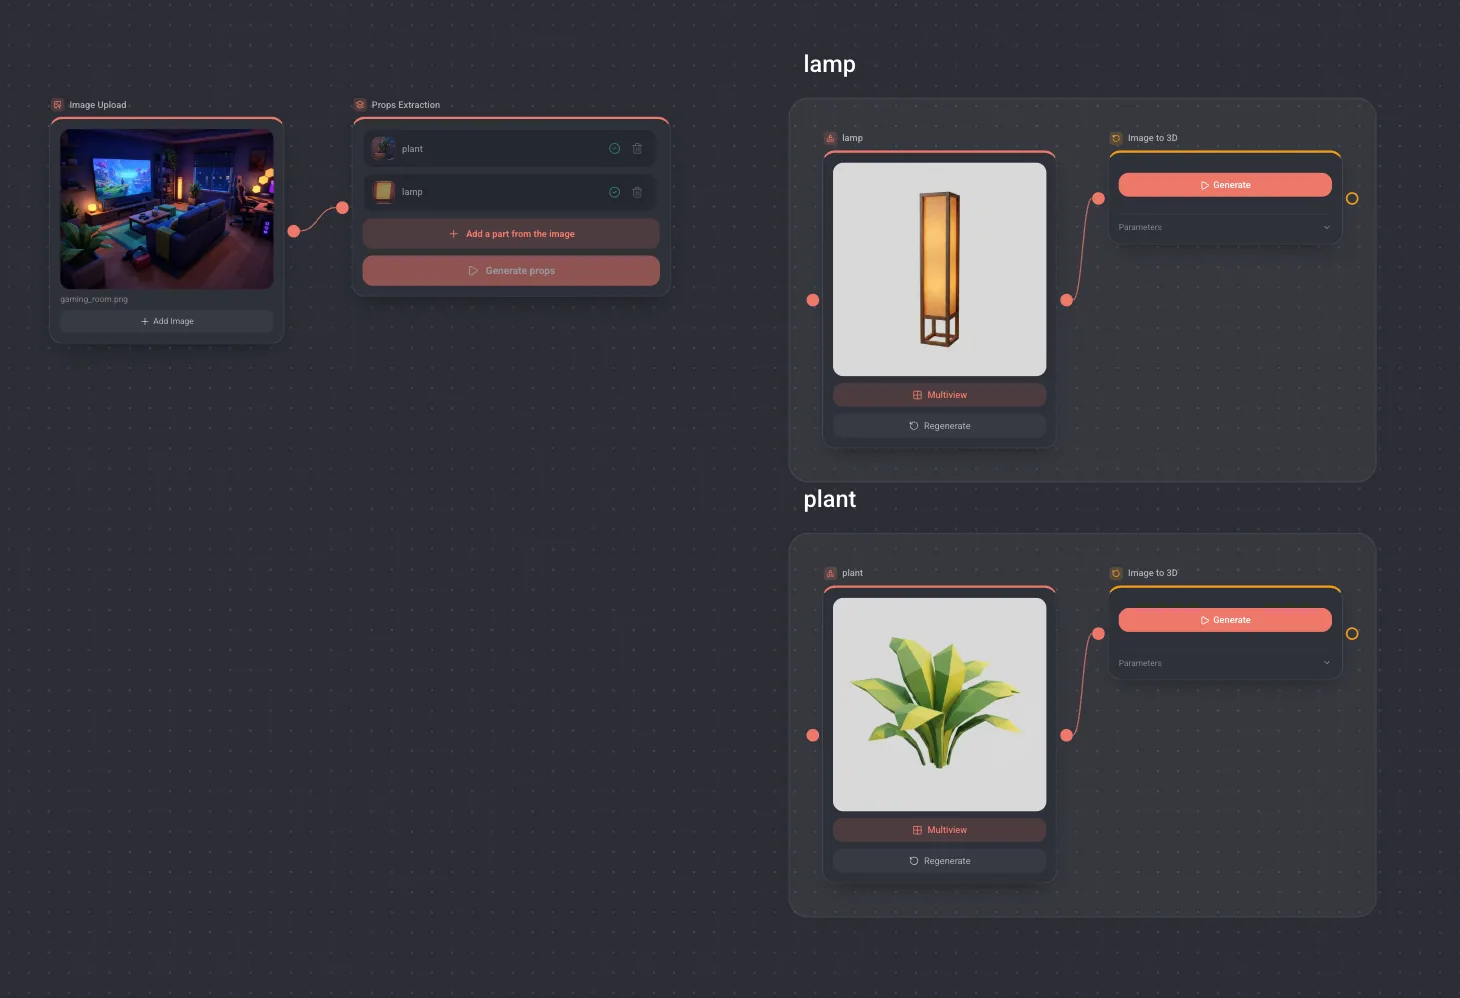
One character illustration usually holds a dozen usable objects: a hat, a vest, a tie, a pair of shoes. A room holds as many again, from the plant in the corner to the lamp beside it. Props Extraction gets them out for you, and it asks first how the objects should be found.
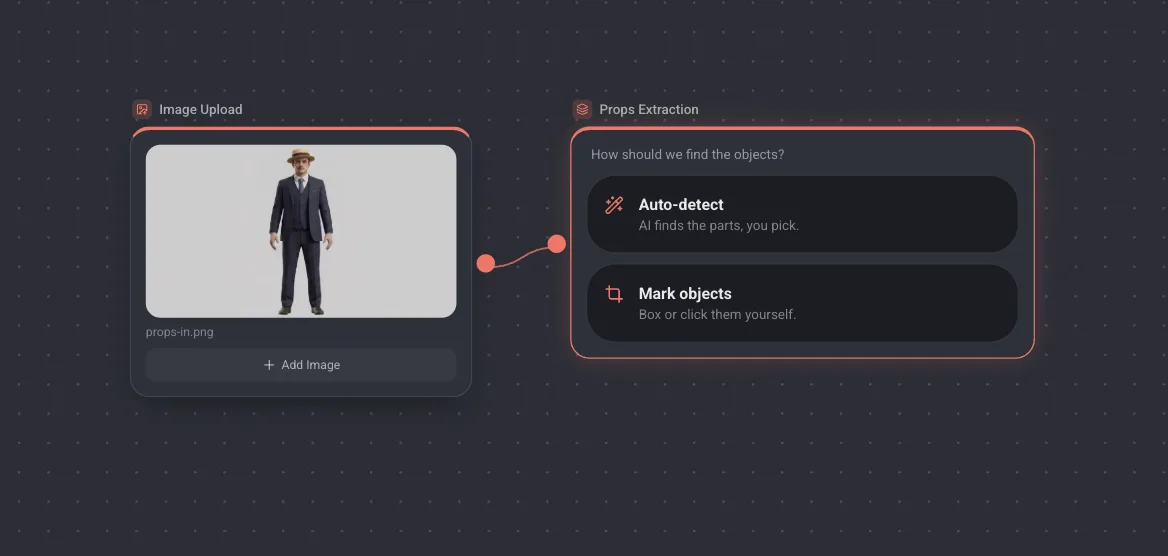
Auto-detect
- 1Wire a character image, a scene or an inspiration board into the node and run it.
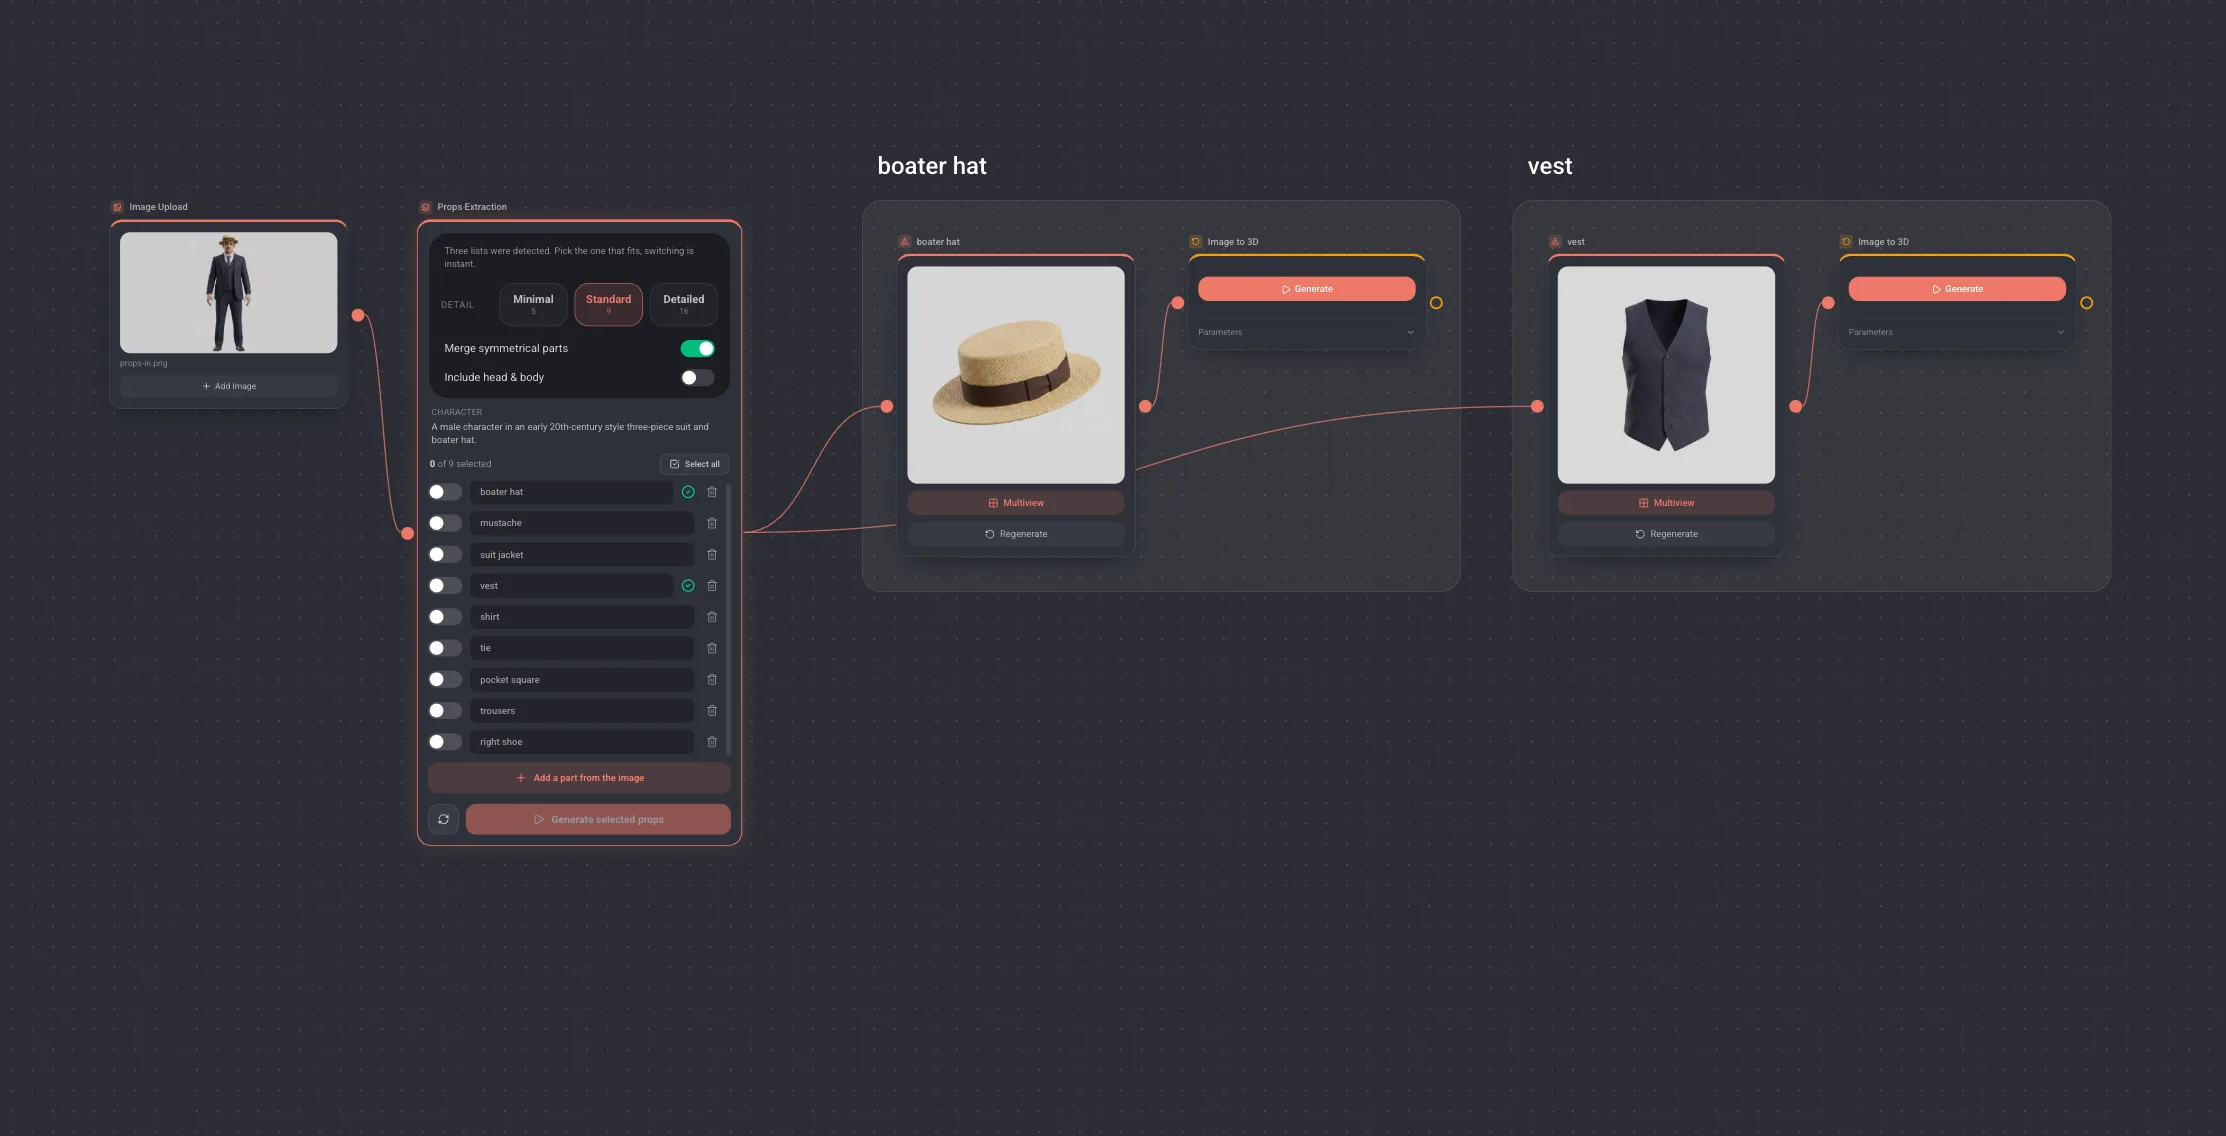
- 2Pick a list. The analysis returns three of them, Minimal, Standard and Detailed, each with its own count. Switching between them is instant and costs nothing, so start at Standard and go up when the parts you want are being grouped together.
- 3Tick the items to keep. Rows can be renamed in place, and Select all takes the whole list at once.
- 4Press Generate selected props. Each item becomes its own node, holding its own isolated image, filled in as the work completes.
Two switches sit above the list. Merge symmetrical parts keeps a pair of boots as one entry instead of two, and Include head & body decides whether the character itself is offered alongside the things it is wearing.
If something is missing from the list, Add a part from the image lets you point at it on the picture instead of typing a description. It lands in the same list as everything else.
Mark objects
Pick this one for scenes and detailed characters. A dense image gives the analysis fifty things to list, a plant against a bookshelf reads as one shape, and a layered outfit groups the vest with the jacket. Outlining answers all three, because the region is drawn rather than guessed.
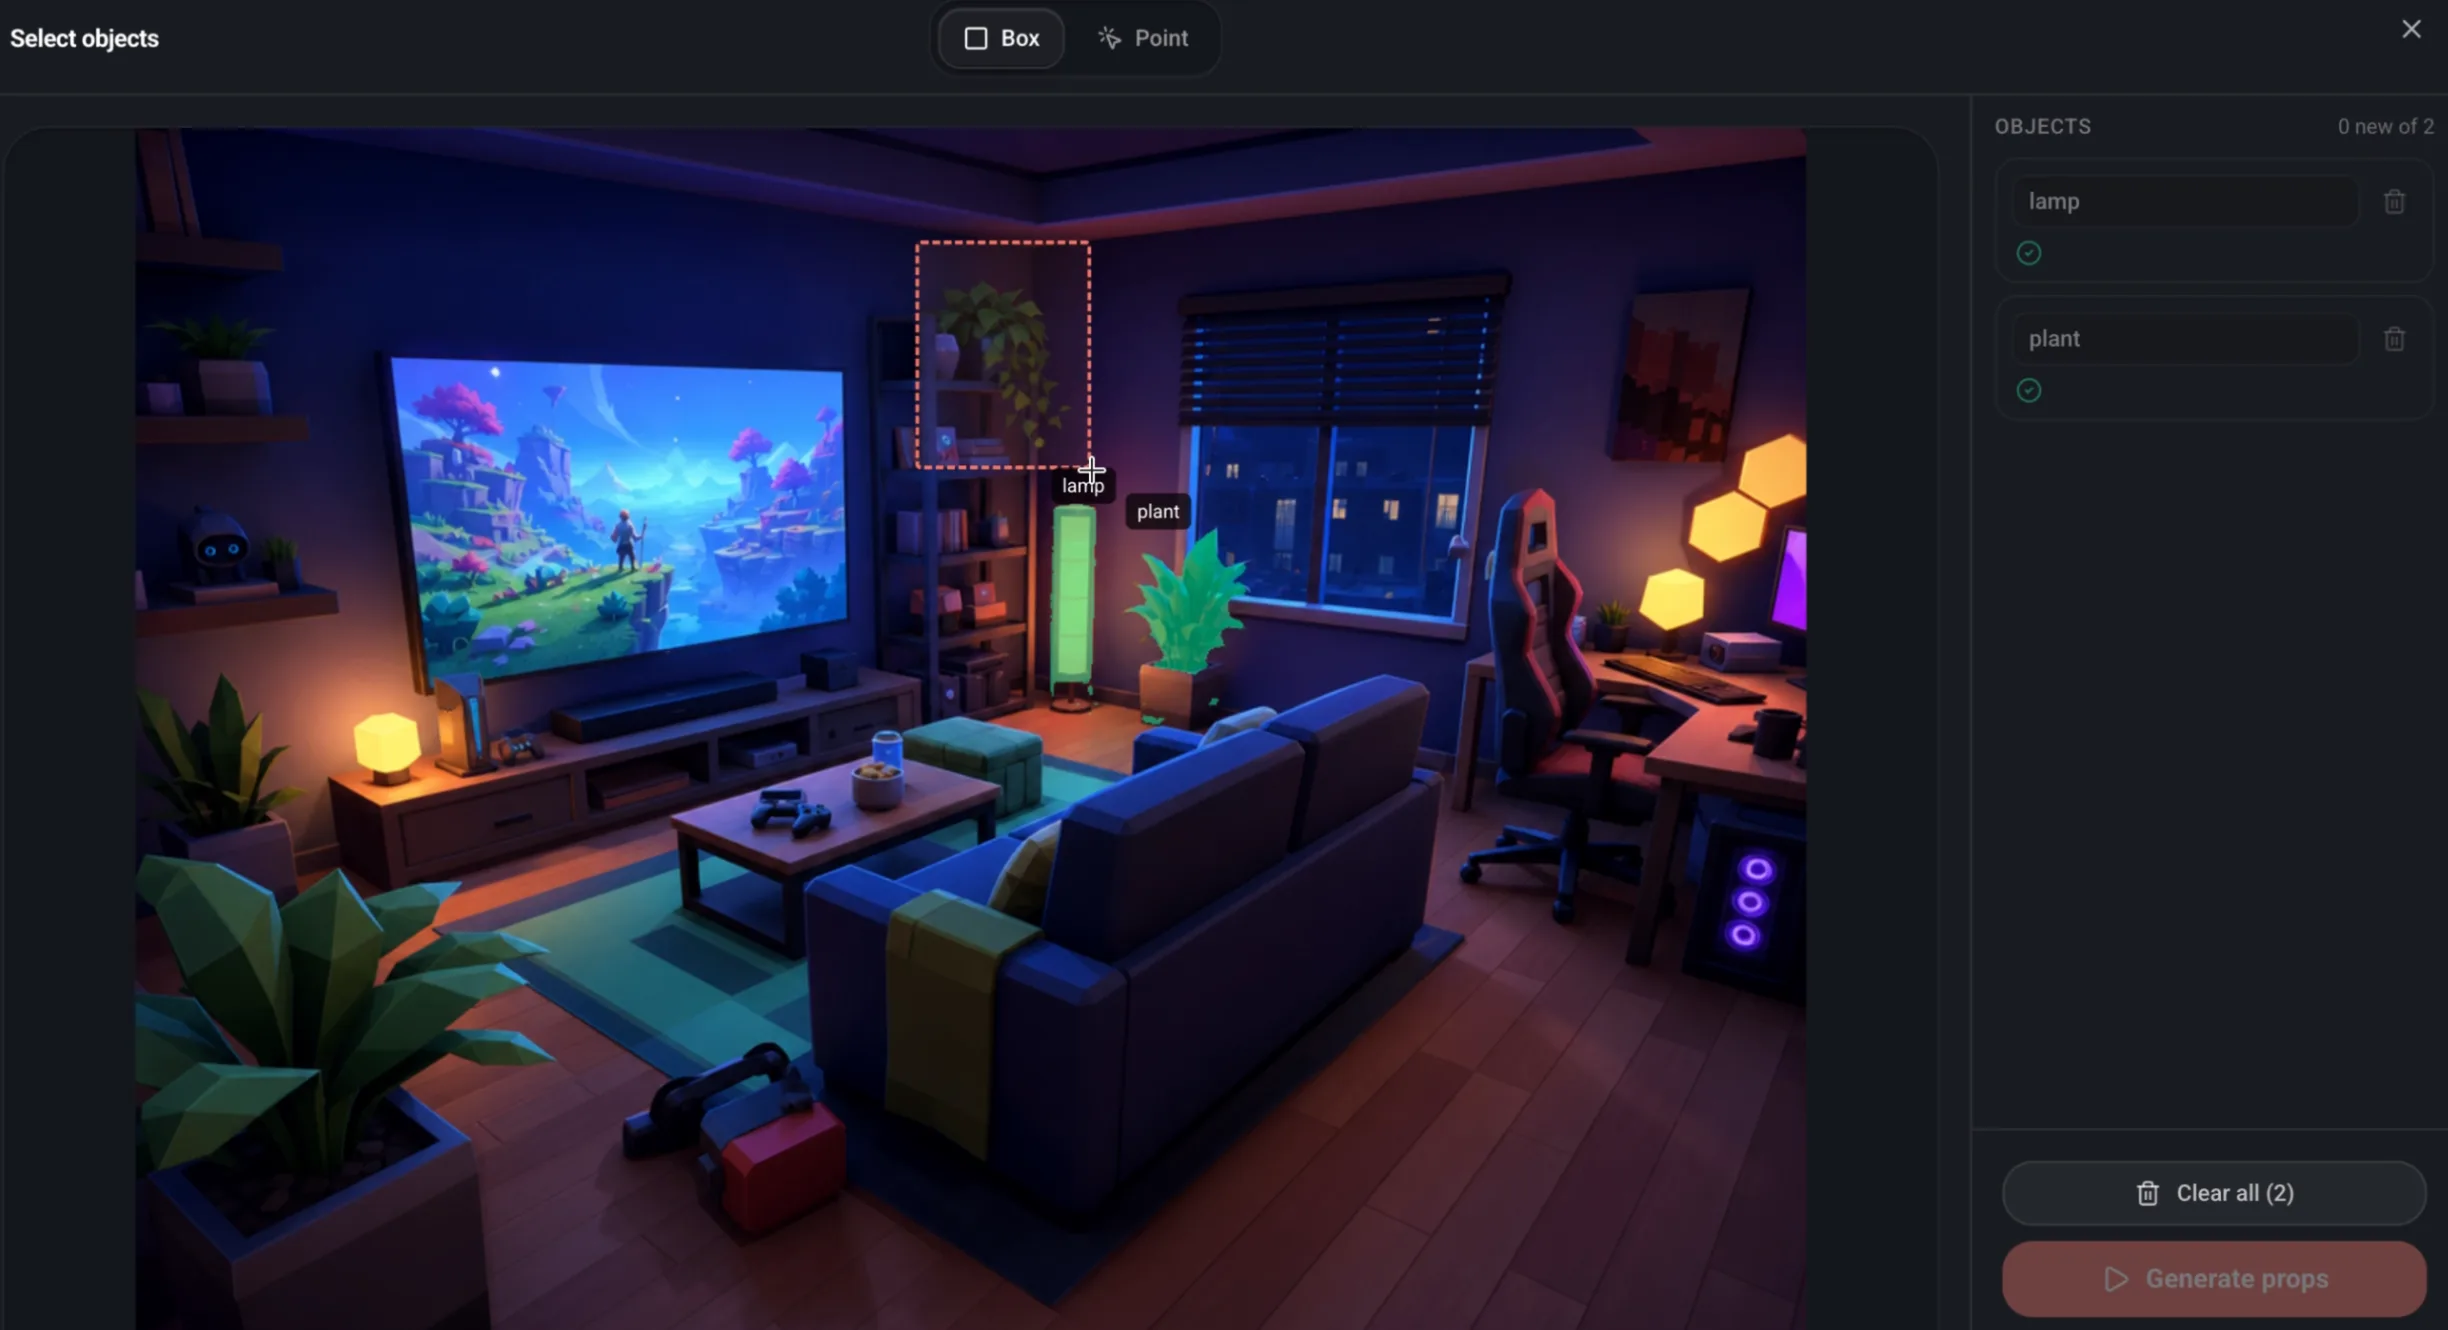
- 1Choose Mark objects and press Select objects. The image opens full screen.
- 2Drag a box around an object, or switch to Point and click it. Box bounds the whole object, which is safer on anything with small parts. Scroll to zoom, and use Move to pan.
- 3Name it. The name becomes the prop node's name.
- 4Repeat, then Generate props. One Extracted Prop node per object.
Edges are found while you keep drawing, so you never wait between objects. Closing the window mid-detection is safe: the objects finish on the node, and generating waits until they are done.
Fixing an outline
If an outline takes in the shelf behind the object or drops one of its leaves, press Fix outline and click on the image.
- The green plus, Include, adds a piece that was missed.
- The red minus, Exclude, takes out something that does not belong.
- The cursor shows which mark the next click places. Click a mark again to remove it, or undo the last one. Press Enter when it looks right.
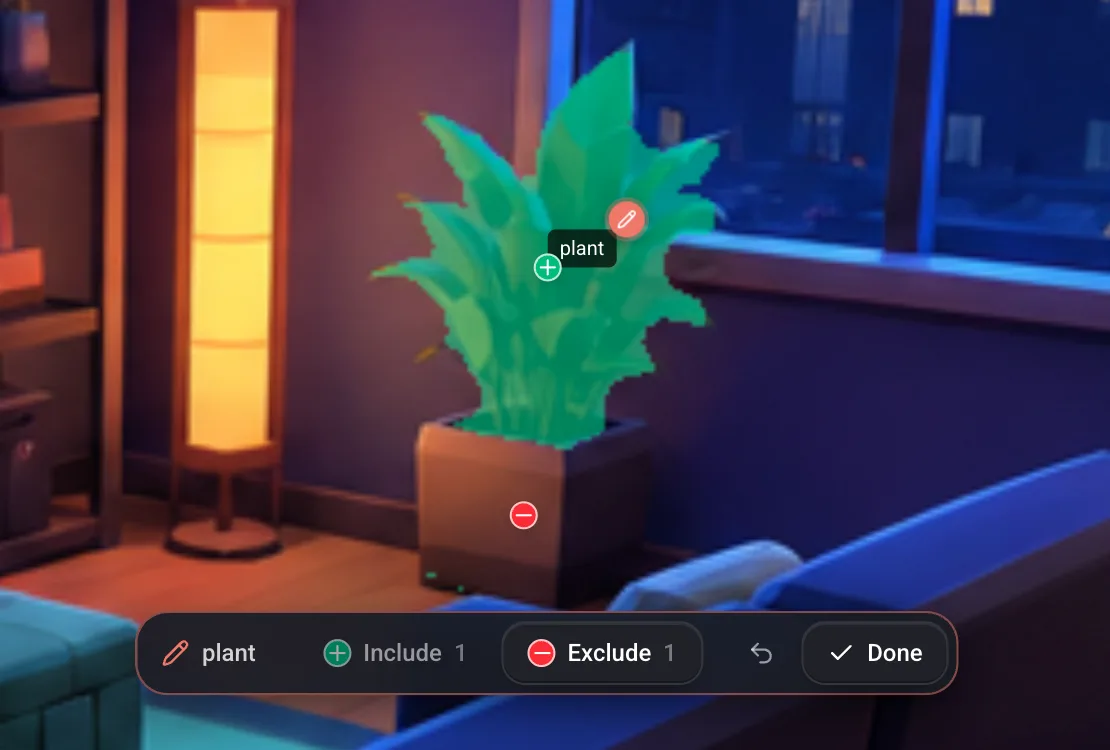
Marking and correcting are free. Generating is what costs credits, one prop at a time.
Either way, from a prop node you can upgrade it to a four view sheet, send it into Image to 3D, or feed it to Prop Variations for alternatives in the same style.
Edit an image with a prompt and a brush
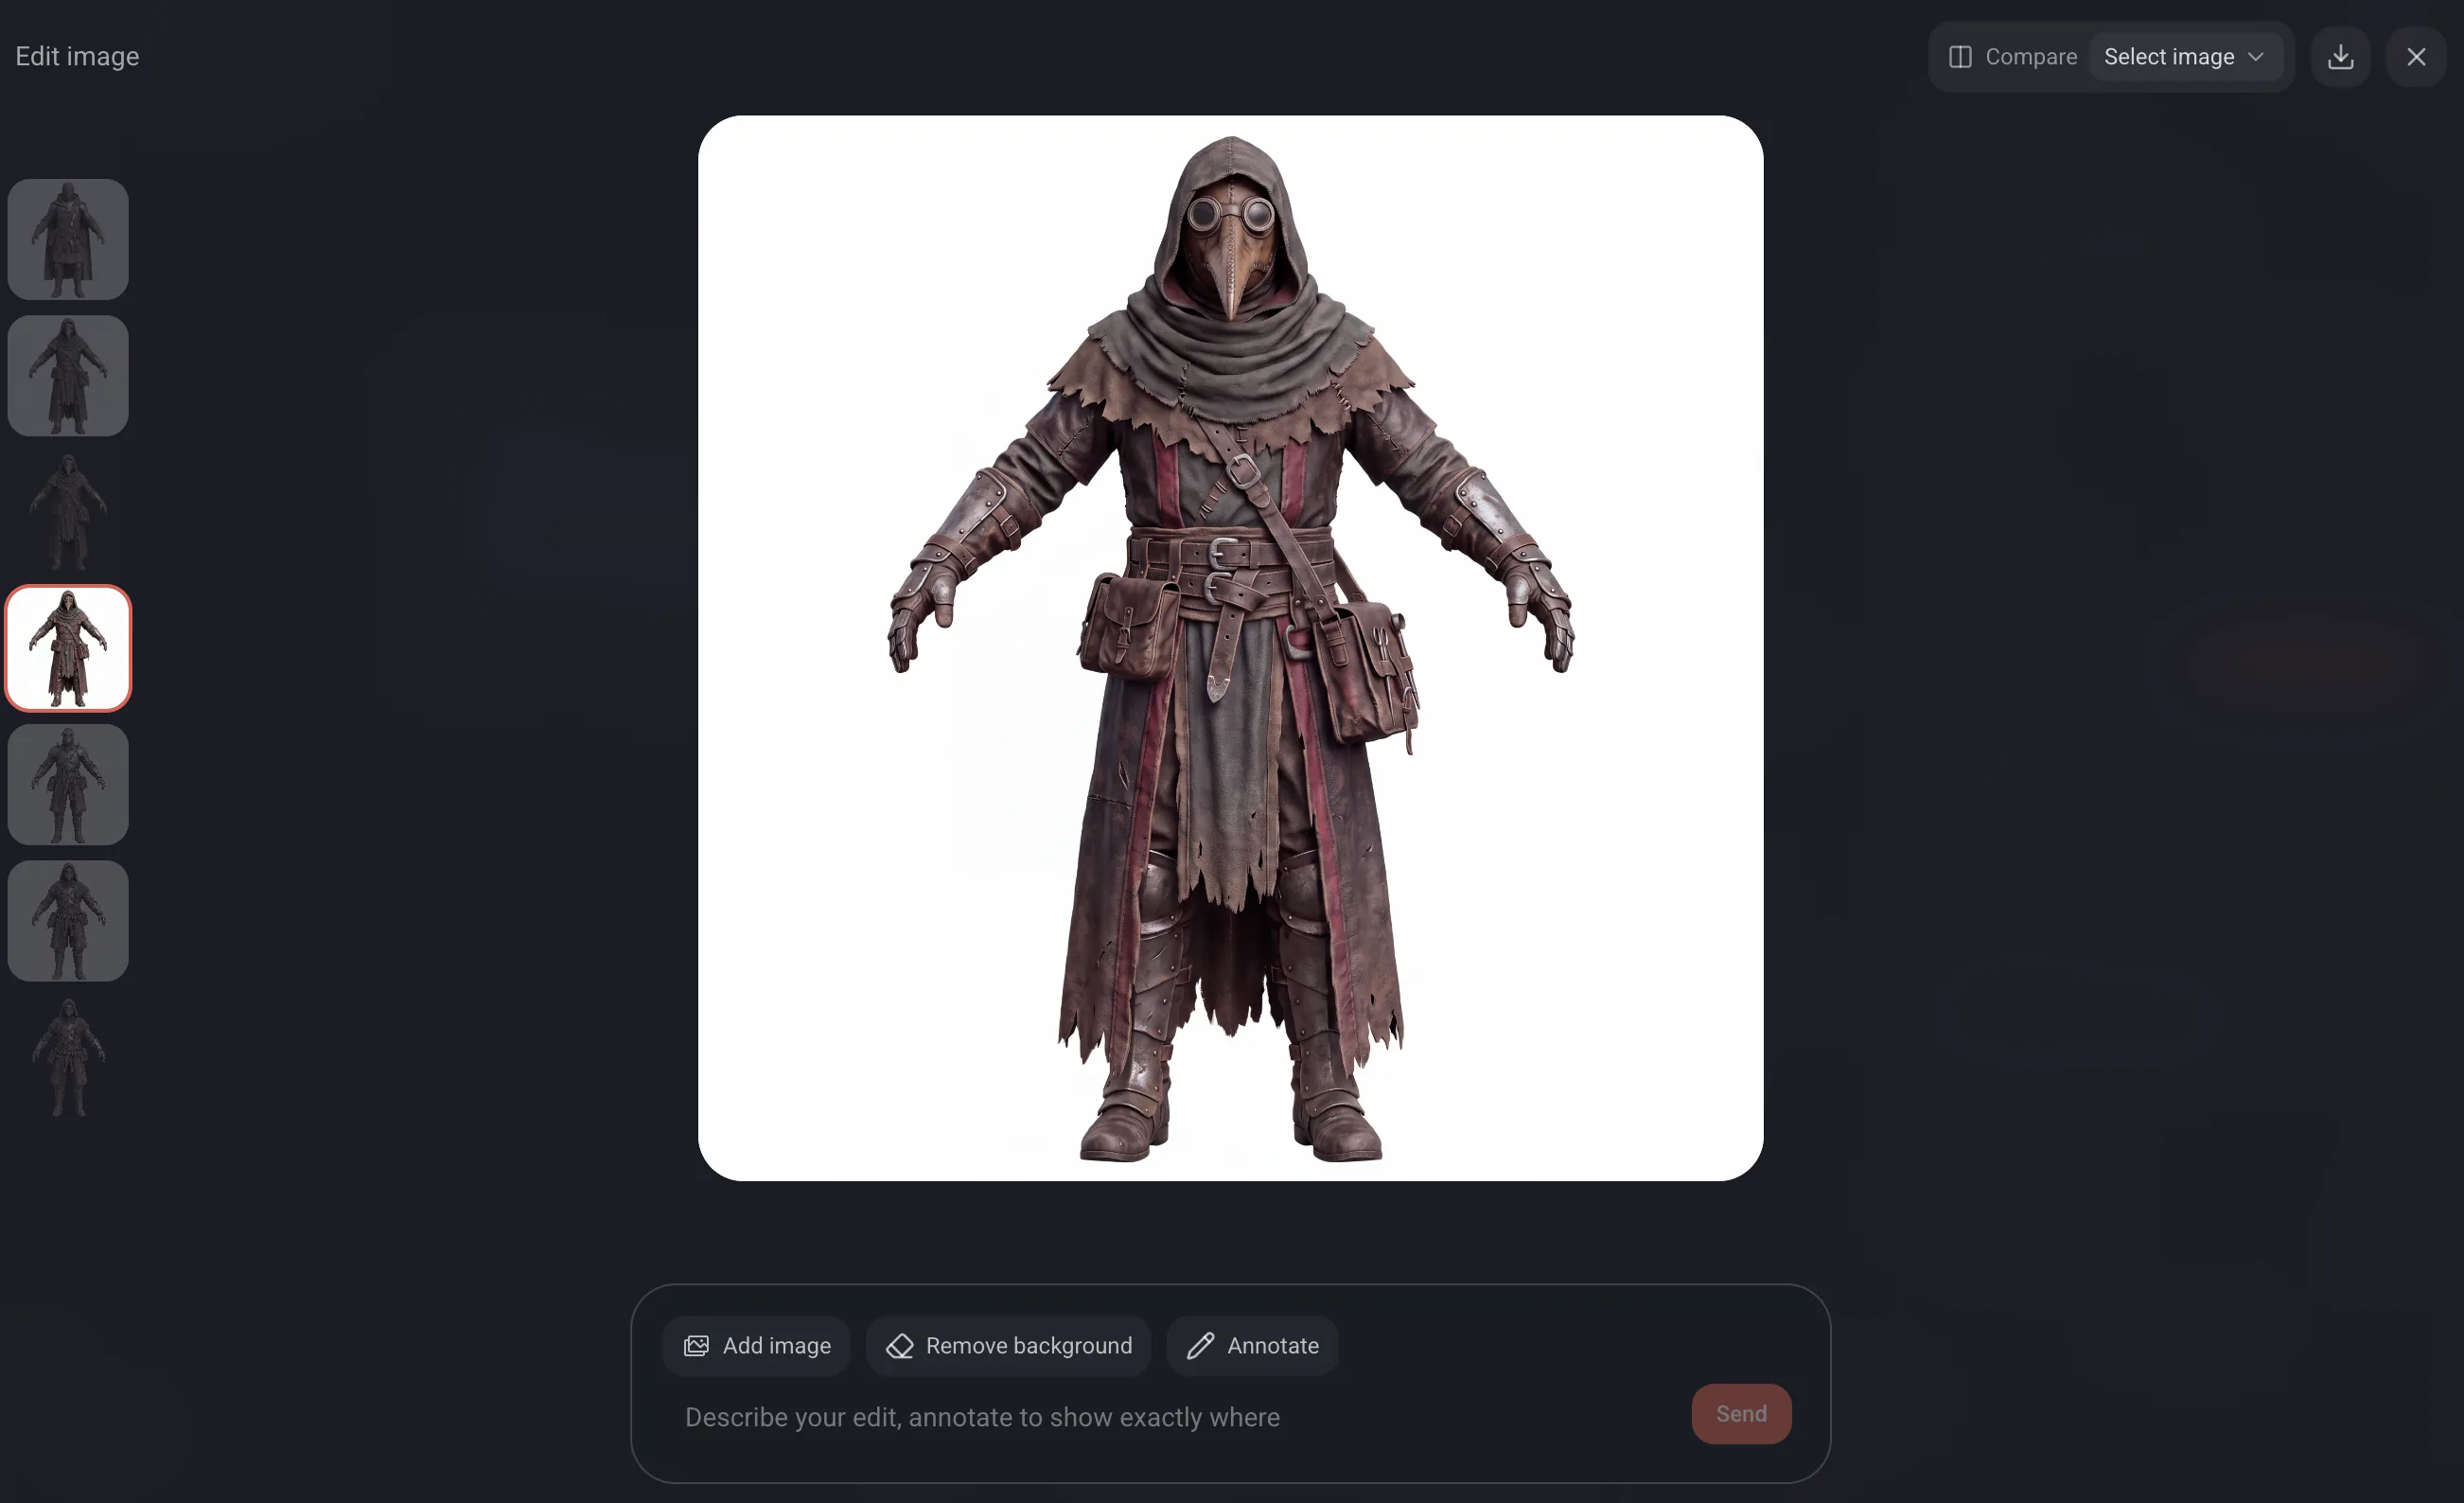
Edit Image is for one change on one picture. Open the node and you get an editing surface over the image itself, so you can point at the part you mean instead of describing where it is.
- 1There are three ways in: edit any generated image right on its node, wire an image from another node into Edit Image, or drop a file straight onto it.
- 2Write a short instruction, for example make the jacket red. The field is deliberately short, because one clear sentence beats a paragraph here.
- 3Mark the area if it helps. You have a pencil and brush, an eraser, text, arrows, circles and squares, a color picker, and undo. A circle around the sleeve removes any doubt about which sleeve.
- 4Add up to two reference images if the change needs something to match, then generate.
Every edit is kept in a version rail beside the image, so you can step back to an earlier state, compare two of them side by side, and download the one you keep.
Turn a still into a shot
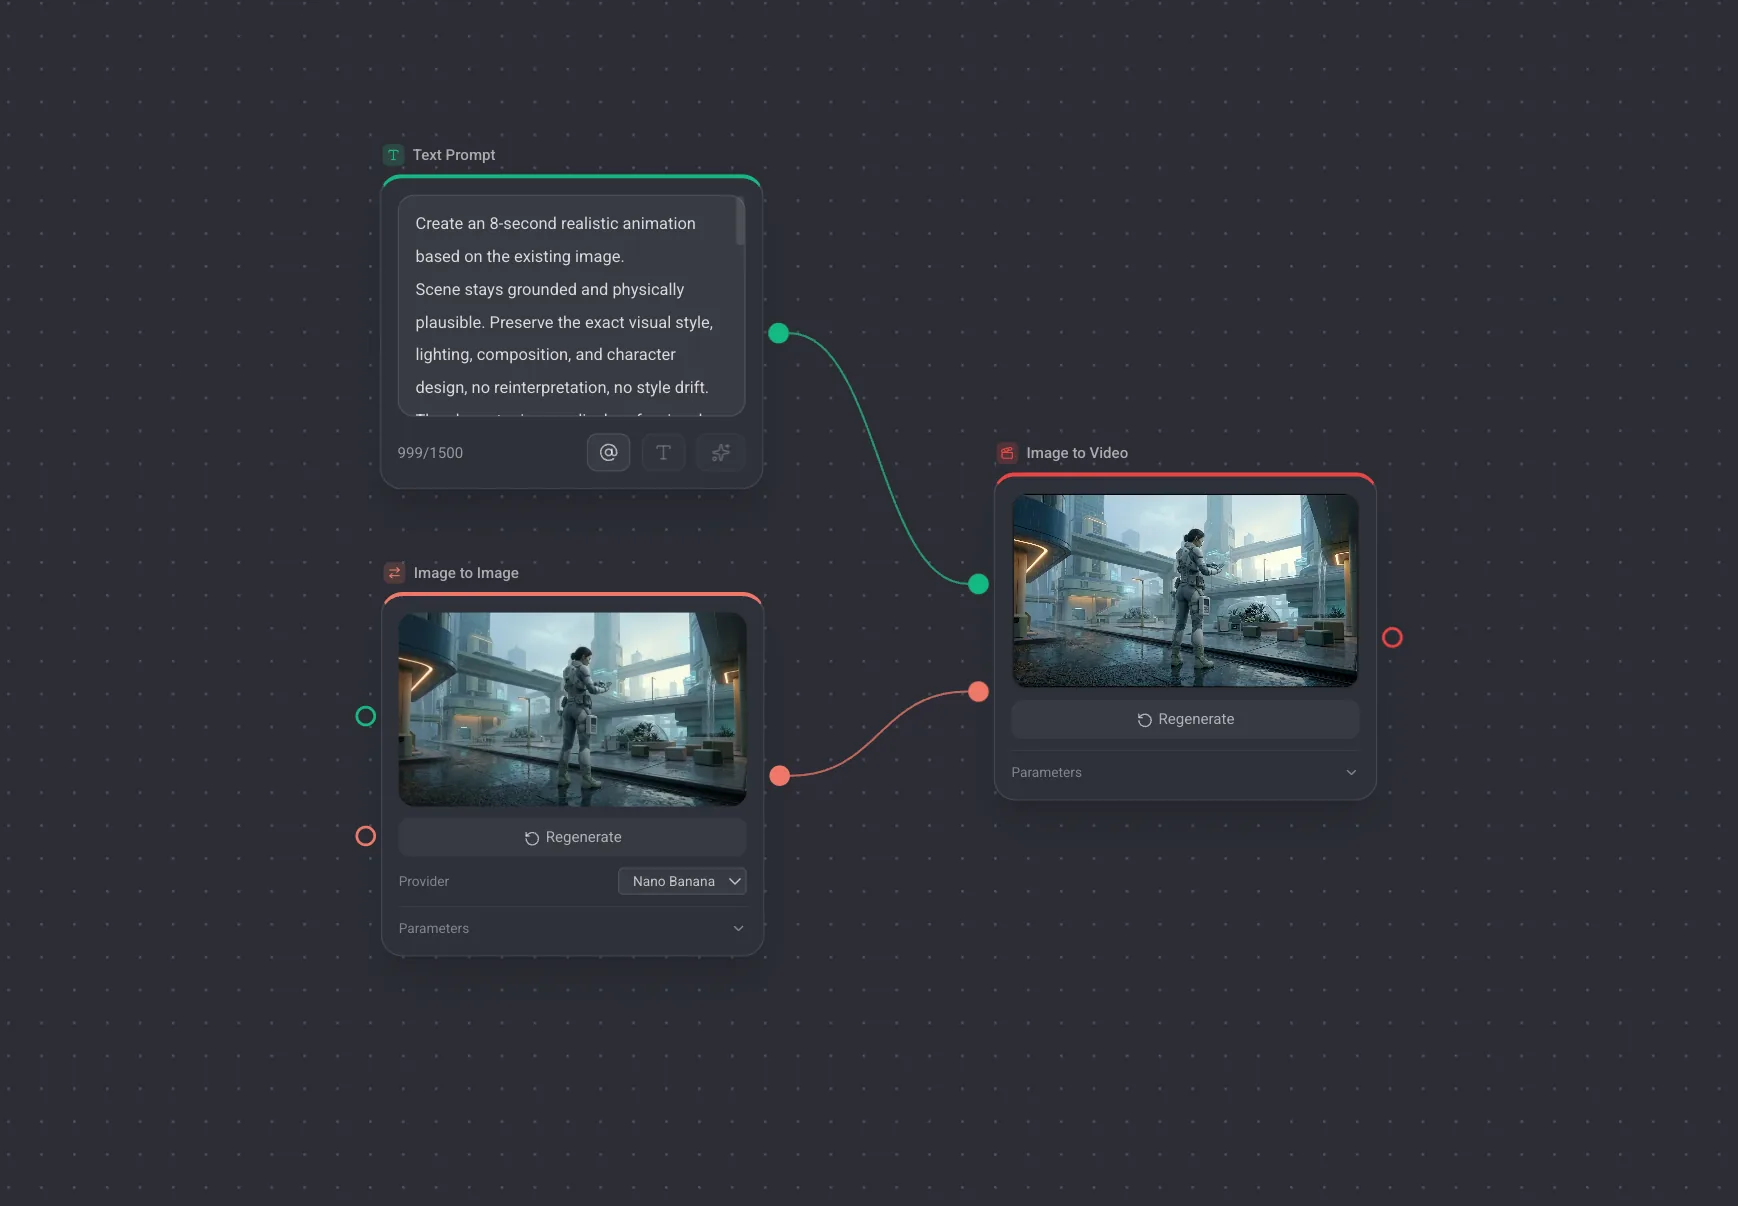
Image to Video has two frame slots, a first frame and a last frame. You do not need both. Give it a first frame and it animates forward, give it a last frame and it animates towards it, give it both and it travels between them.
Write the prompt about the motion, not the subject. What moves, how fast, and what the camera does. The subject is already in the frame.
If the shot ends too soon, wire its output into Extend Video and describe what happens next. Duration, resolution and aspect ratio live in the properties panel of each video node, and duration is always explicit so the cost is known before you run.
Work on a model you already have
You do not have to generate a model to work on one. 3D Upload takes a GLB, OBJ or STL file and puts it on the canvas as a normal 3D output, so every 3D node downstream treats it exactly like a generated model.
Export GLB rather than glTF when your other tool offers both. A .gltf file points at separate buffer and texture files, and a single upload cannot carry those along, while GLB packs everything into one file.
From there the usual four are available: Texture Model to repaint it, Retopology to reduce it, Stylize Model to restyle it, Export Model to convert it. Home also has a ready made pipeline for each of those under the group for a model you already have, which saves you the wiring.
Compare results and go back
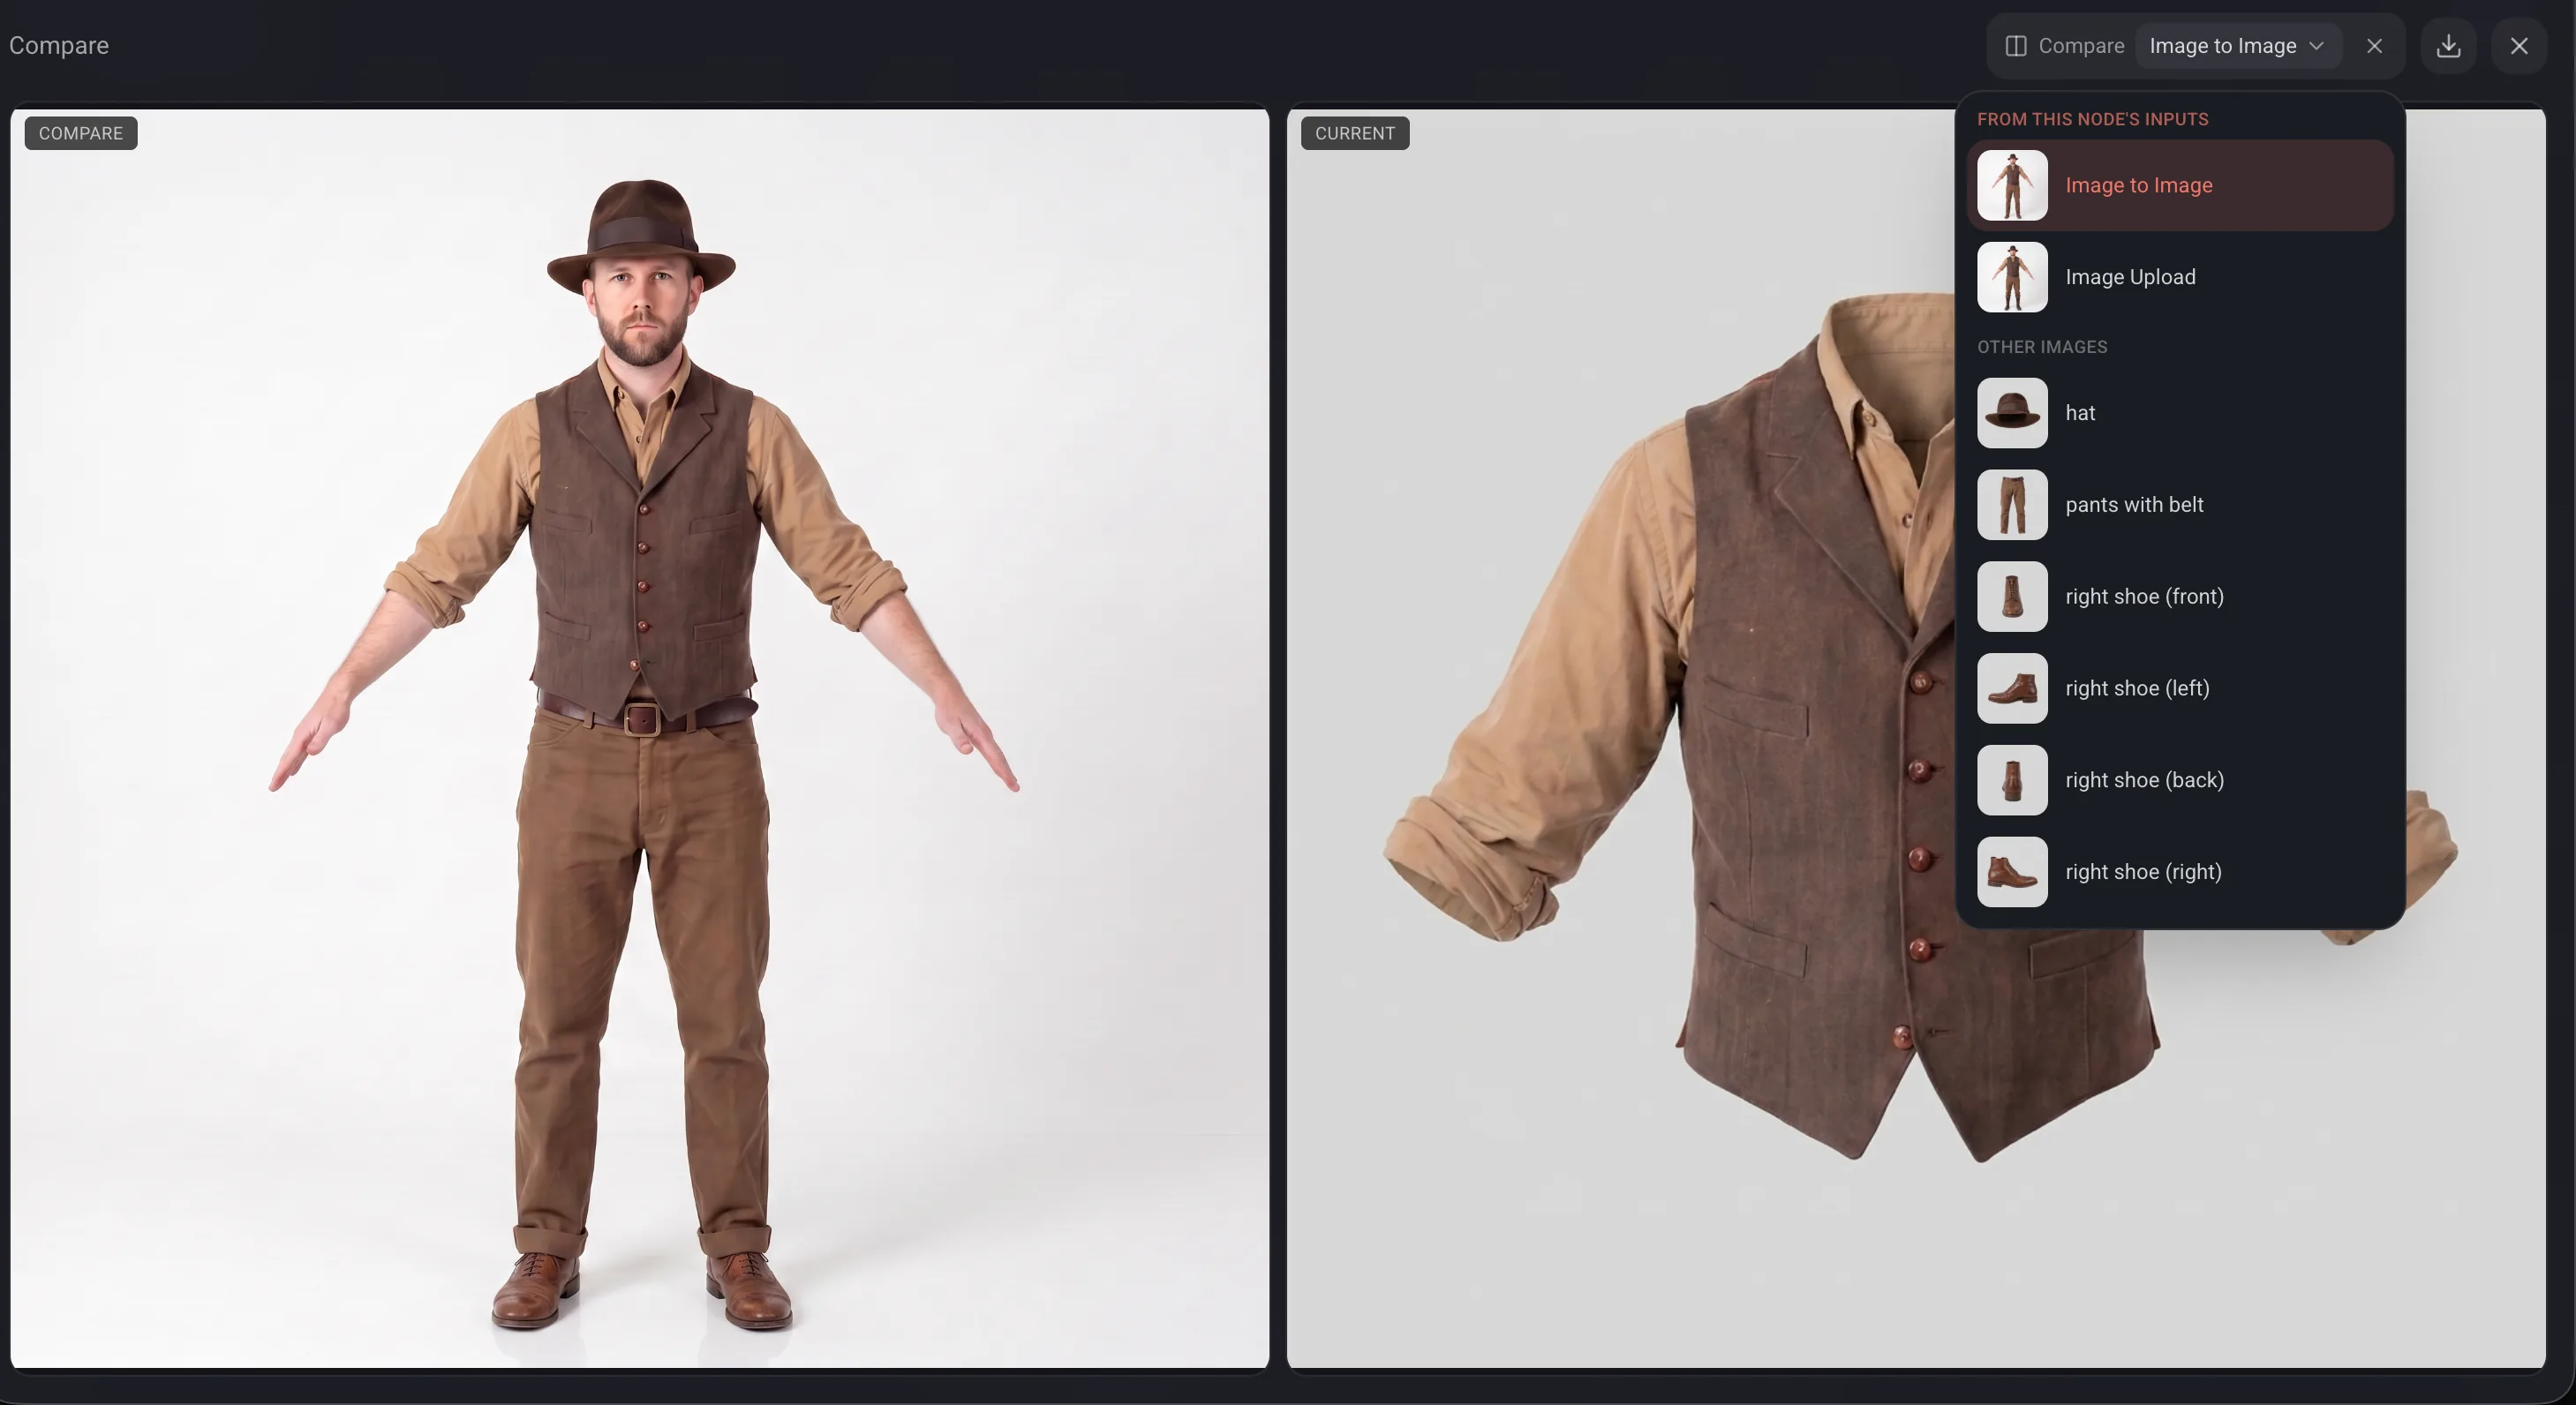
A node keeps its history. When you regenerate, the previous result is not lost: small arrows on the node step through the generations it has produced, so you can go back to the one you preferred and carry on from there.
- Compare puts any two results from the project side by side: two images, a single angle from a Multi-View result, or a 3D model against the image it came from. Use it before you commit to a run, or after one to check the model kept the design.
- Full screen gives you the large view, the render modes for a model, and a download button.
- Download lets you set the file name first, and the node remembers that name for next time.
Find every asset in the project
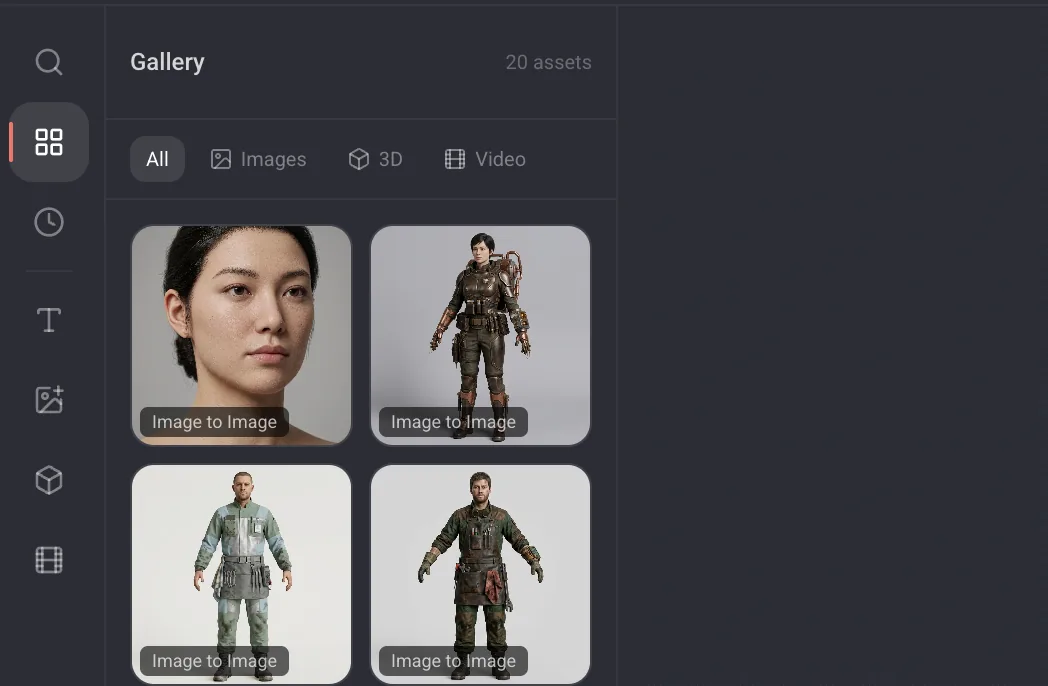
After an hour of work, a canvas holds more results than you can see at once. The Gallery in the left rail lists every asset the project has produced, filtered by All, Images, 3D or Video.
- Open one full screen to look at it properly.
- Download it, or copy it to use elsewhere.
- Use Locate to jump the canvas to the node that made it. This is the fastest way back to a result you remember but cannot find.
Reuse a style or a character
Some references come back on every project: a house style, a recurring character. Instead of rewriting the same paragraph and re-uploading the same images, save them once in the Library. It belongs to your workspace, not to one canvas, so it follows you into every project.
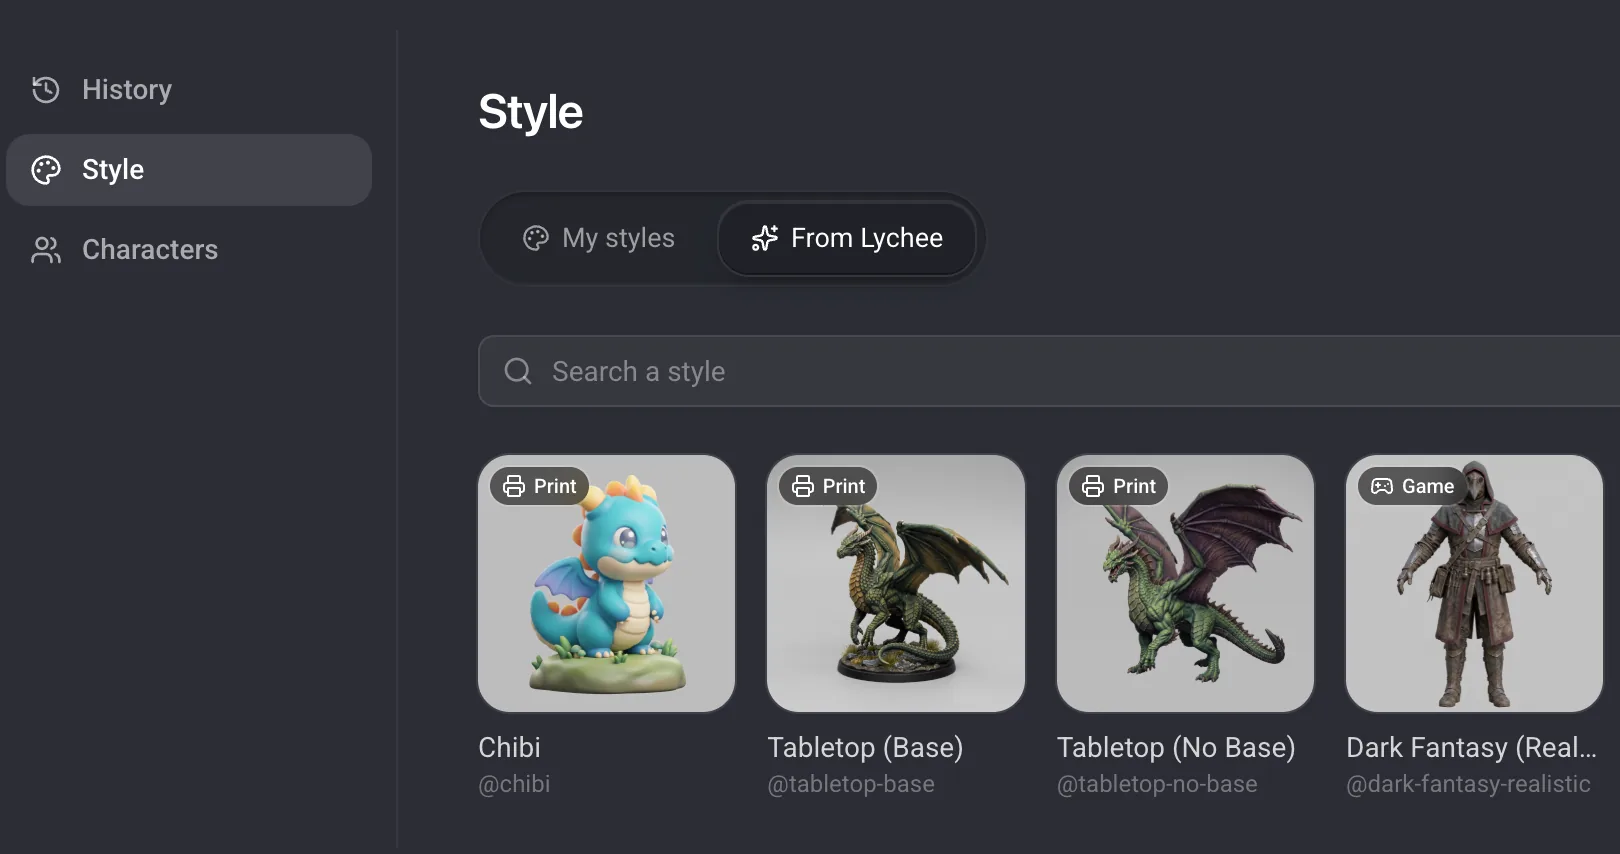
- Style and Characters hold what you save on purpose. Each one gets a handle, and the handle is what you type in a prompt.
- History is everything your workspace has already generated. Search it by project or by node when you want an old image back.
- The toggle at the top switches between My styles and From Lychee, the sets we ship. Ours are read only, but you can use them exactly the same way.
Creating a style or a character
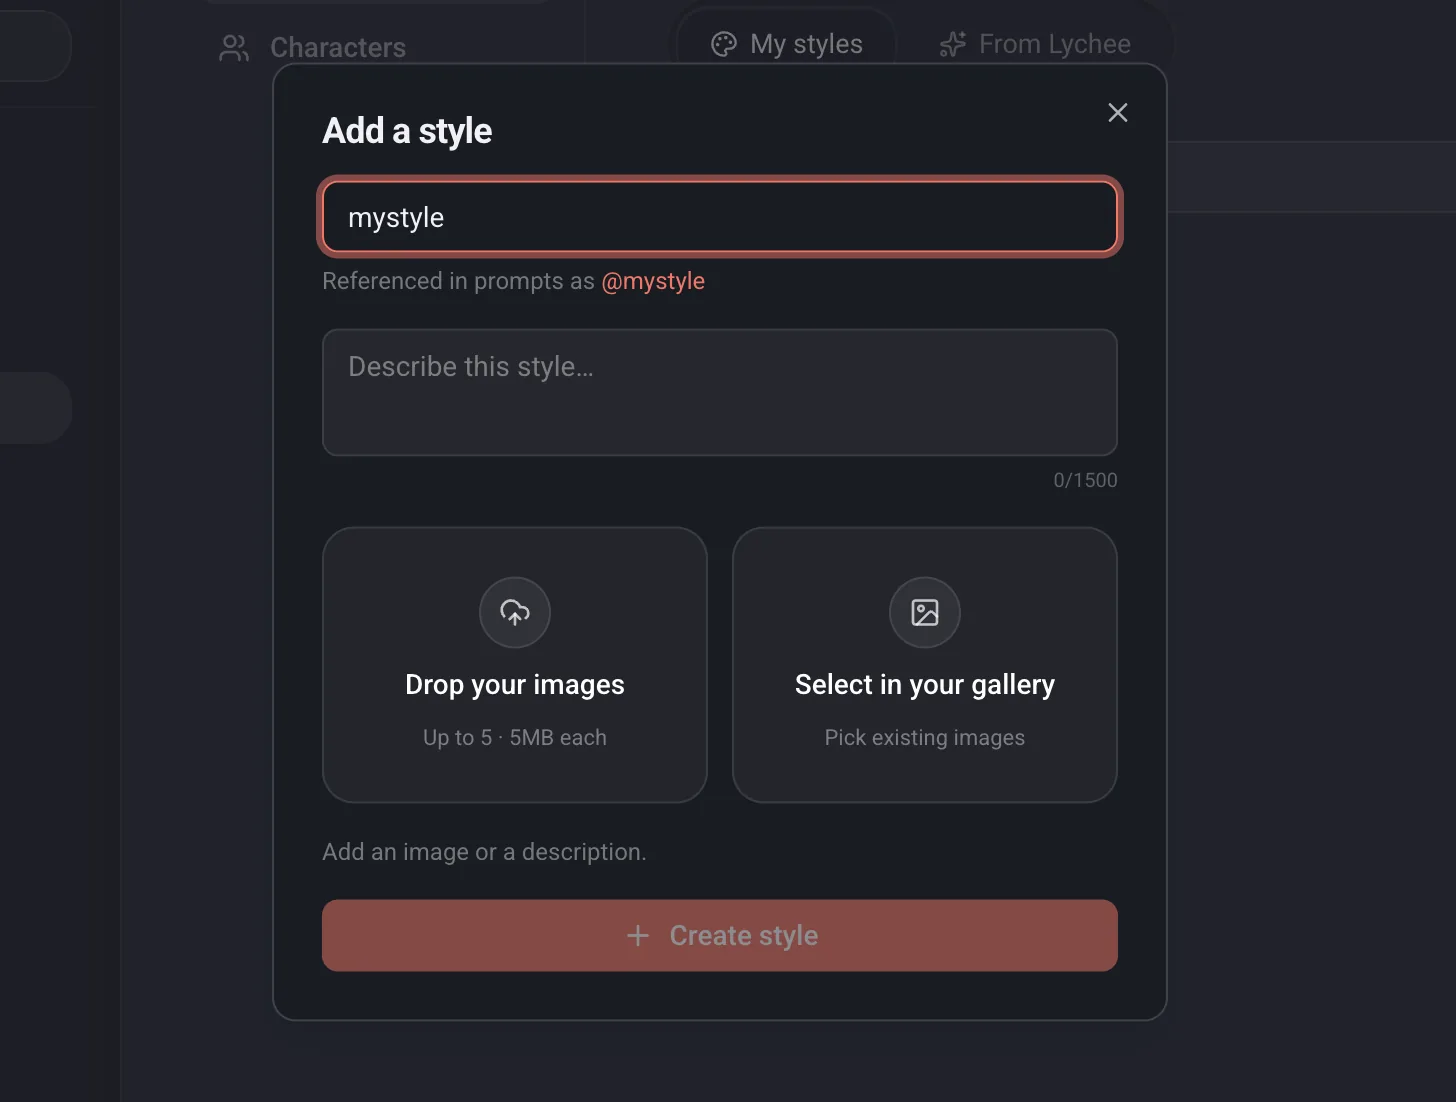
Press New style or New character on the Library page. The dialog is the same for both, and it asks for three things.
- 1A name. As you type it, the dialog shows the handle it will answer to, for example @chibi. Keep it short, because you will be typing it.
- 2A description.Write it as you would write a prompt, since this is the text that gets injected into your prompts later. Up to 1500 characters, so there is room for the palette, the lighting, the lens, or for a character's clothes and build.
- 3Up to five reference images. Drop files in (PNG, JPEG or WebP, 5MB each) or press Select from your gallery to reuse something you already generated. For a character, several angles of the same person hold consistency much better than one.
An image or a description is enough on its own, so you can start a style from one picture and write the words later. Reopen an asset any time to change its images or its text, or to delete it.
You can also create one without leaving the canvas. In any prompt field, type @ followed by a name that does not exist yet, and the menu offers to create it as a style or as a character. Save the dialog and the mention drops into your prompt where the cursor was.
Using one
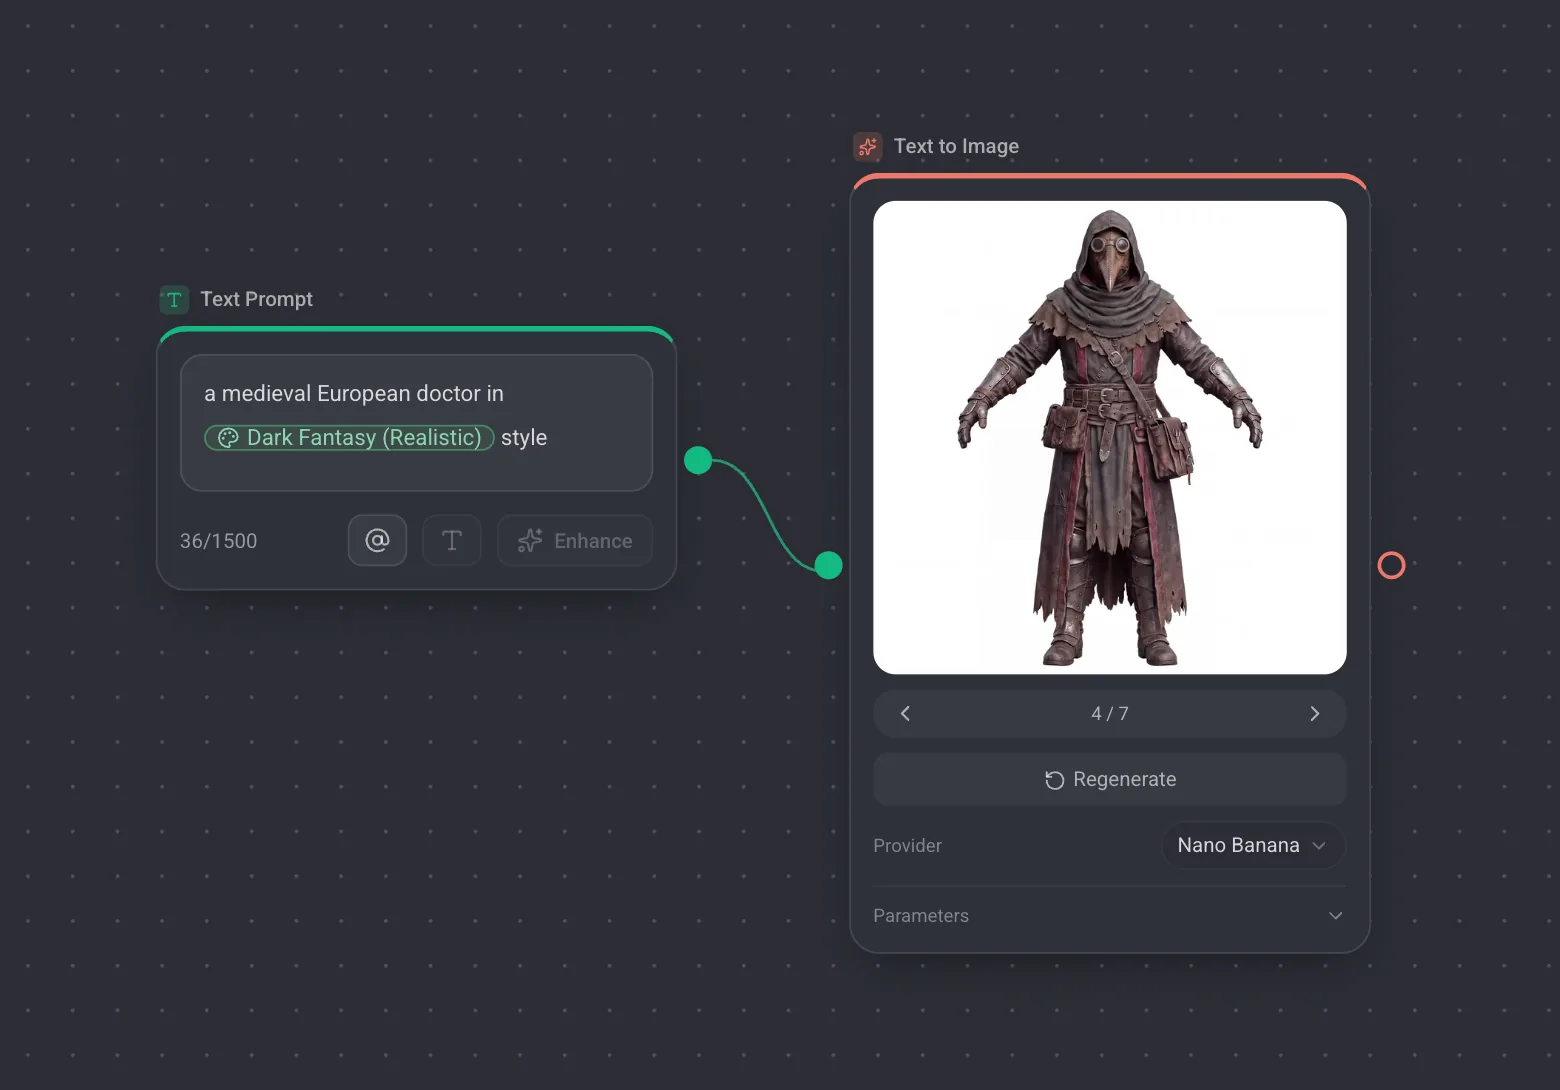
Type @ in any prompt field and pick from the list. The mention becomes a small chip, so you can see at a glance which references a prompt is carrying.
When you generate, Lychee swaps the chip for the description you wrote and attaches the asset's images as references. The name itself is never sent to the model, only the content you put inside the asset. This is why a vague description gives vague results, and why it is worth writing that text once, properly.
From the Library page, Use in project does the wiring for you. Pick a new project or an existing one, and a Text Prompt node arrives on the canvas with the mention already in it. The same @ key mentions teammates in comments.
Working faster on a busy canvas
A real canvas grows to twenty or thirty nodes. These are the things that keep it workable.
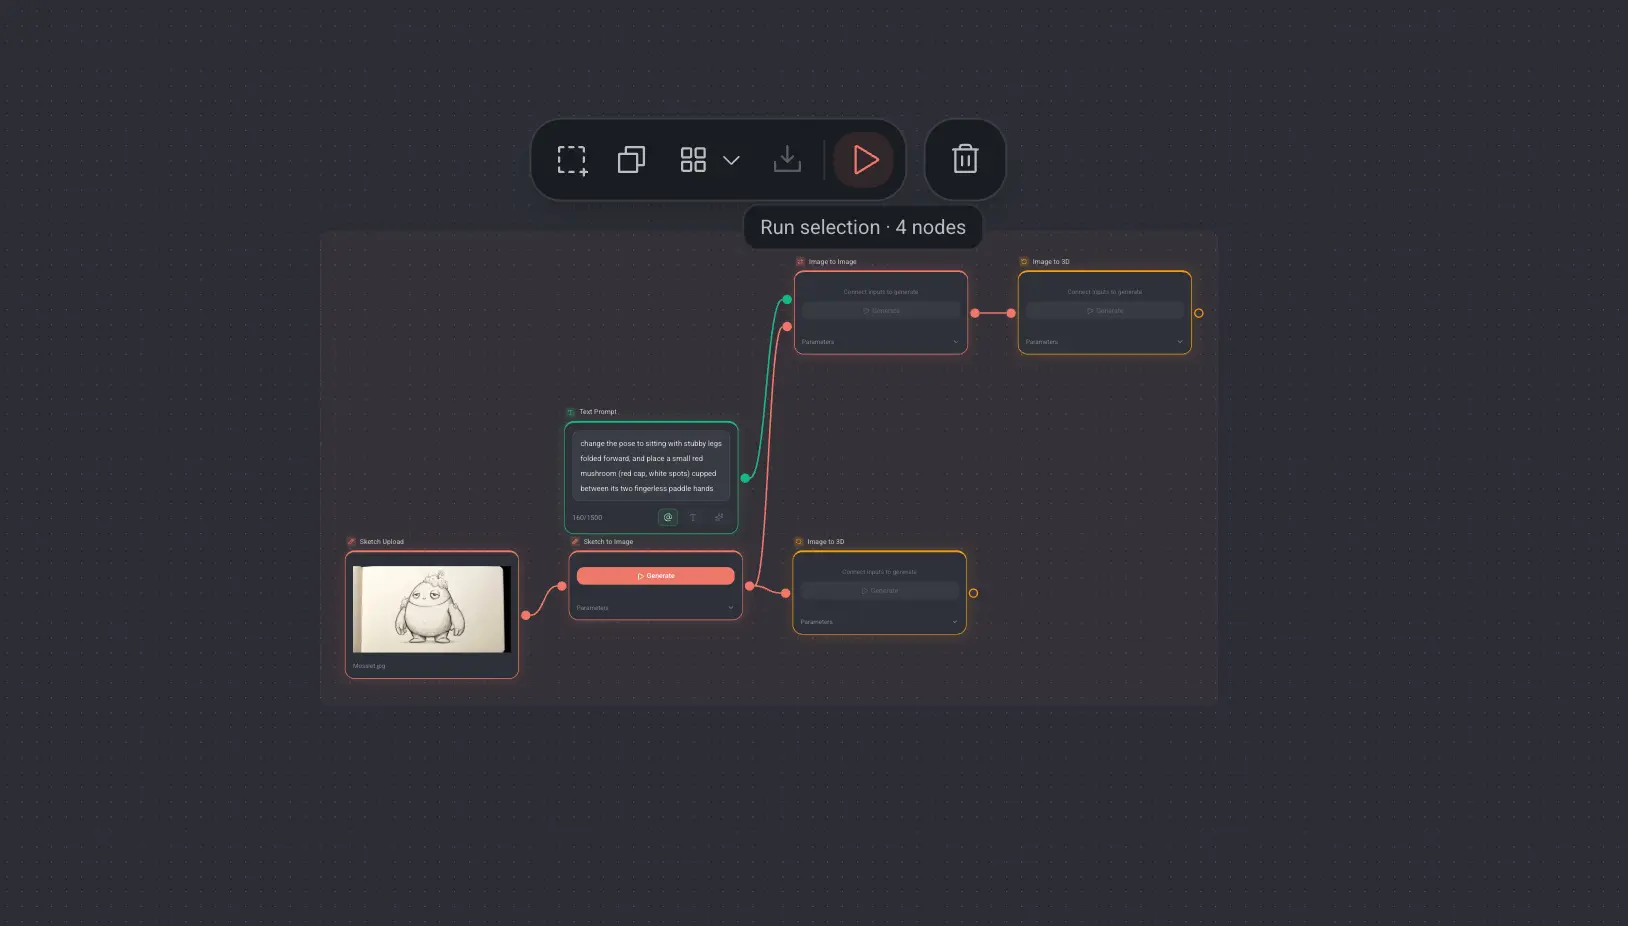
- Run several nodes at once. Select them and press CmdEnter, or use Run in the toolbar that floats above the selection. The button tells you how many will run. Nodes that already hold a result are skipped, so a batch never pays for the same thing twice.
- Group what belongs together. Select nodes and press CmdG to wrap them in a frame you can name and color. Drag a node into the frame to add it, out of the frame to remove it. A group can be run, duplicated, or downloaded as a set of assets in one click.
- Tidy the layout. ShiftA arranges nodes along their connections. With a selection, the arrange button also offers vertical, horizontal and grid.
- Find your way around. Cmd0 fits everything back into view, and the minimap in the corner can be hidden when you want the room.
- Annotate for the next person. A Note node next to a branch beats explaining it twice.
Undo covers almost everything, with one exception: it waits while a generation is running, rather than pulling the canvas out from under a job in progress.
On Windows and Linux, read Ctrl wherever this list says Cmd. The full list also lives in the editor, behind the keyboard icon at the bottom of the left rail.
Working with your team
Everyone in a project works on the same canvas at the same time. You see named cursors, you see what other people have selected, and you never overwrite each other. If two of you run a batch, the second one skips the nodes the first one already claimed.
Comments
- 1Press C for comment mode.
- 2Click exactly where the issue is. The pin stays attached to that spot.
- 3Write the comment, and mention a teammate with @ so they get notified.
- 4Reply in the thread, then resolve it when it is done. Resolved pins leave the canvas and stay readable in the comments panel.
Sharing a project
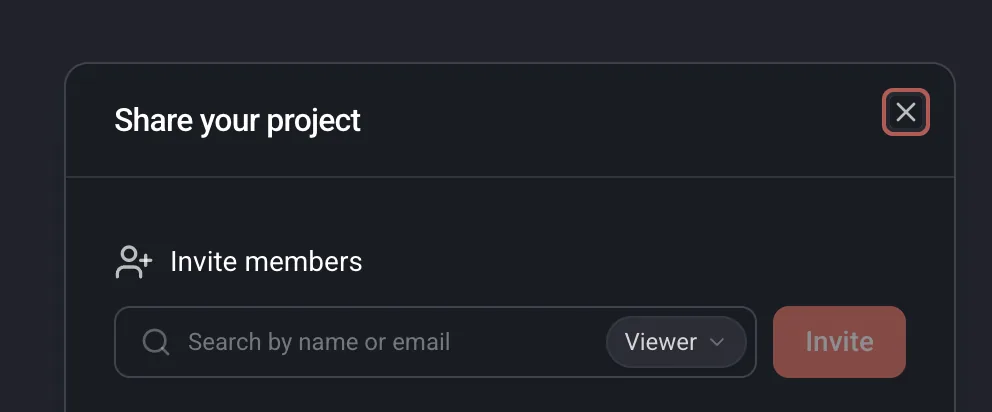
Press Share in the top bar. You have three ways to give access, and they combine.
- Invite a person by name or email address, as Editor or Viewer. An Editor can change the canvas and generate, a Viewer can look and nothing else.
- Set what your workspace gets by default: no access, Editor or Viewer. Handy for a project the whole team should be able to open.
- Create a link for people outside the project. Links are view only, and you choose whether they expire after 7, 30 or 90 days, or never. You can revoke a link at any time.
Projects, templates and files
Everything you make lives in a project, and projects live on the Projects page. Each card shows a picture of its canvas, taken automatically when you leave it, so you recognize the work without opening it.
- Projects holds your own projects and your workspace projects. From a card you can rename, duplicate, share or delete.
- Templates holds finished canvases we built.
- Shared with me lists the projects other people gave you access to, with your role on each.
Make the editor yours
Settings is short on purpose. Four things worth knowing about.
- Keyboard shortcuts. Click a key and press the one you want instead. Any row can be reset, and so can all of them.
- Canvas. Choose what happens when you drop several images at once: ask each time, combine into one node, or one node each.
- Color scheme. The editor ships variants for deuteranopia, protanopia and tritanopia, since port colors carry meaning here.
- Notifications. Pick what reaches you in the app and by email: mentions, replies, resolved threads, invitations, finished generations, billing.
What costs credits
Building costs nothing. Placing nodes, wiring them, uploading your own files, grouping, arranging and commenting are all free, and a canvas can sit half built for as long as you like.
Credits are spent when a generation runs, and the amount depends on the operation and the settings you chose. A detailed texture costs more than a standard one, a longer video costs more than a short one, and a 3D reconstruction costs more than an image. The full tables are on the Credits and Pricing page, split by image, 3D and video, and your usage is in the admin section.
When a workspace runs low, a banner appears at the top of the editor. If you administer the workspace you can buy credits from there. If you do not, the same banner sends a request to the person who can.
Where to go next
The shortest path to being comfortable with all of this is three canvases.
- 1Open Home, pick Text to Image, and take it to a finished picture. Two nodes, a few seconds, and the whole loop of prompt, generate, result.
- 2Pick Image to 3D with the cleaner geometry approach, and watch what the extra views do to the mesh compared with the fastest route.
- 3Open the Templates tab, duplicate a finished canvas, and take it apart. Reading someone else's wiring teaches the parts a guide cannot.
When a node puzzles you, select it and read its properties panel. Every setting that changes a result is in there, named the same way it is named here. And if something is still unclear, Contact Us sits at the bottom of the left rail in the editor.